Start the ImpactControlCenter and initialize the device by clicking "Use" and start a "Continuous" acquisition.

While using a color version of the camera, the PC will calculate a color image from the original gray Bayer mosaic data. For getting correct colors when working with a Bayer mosaic filter you have to calibrate the white balance (this must be performed every time the lighting conditions change).
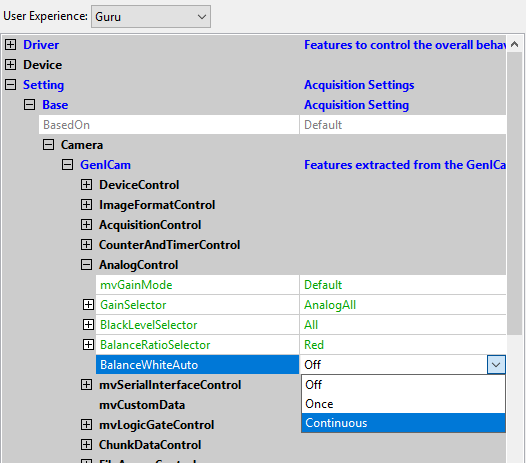
The "White Balance Control" can be found in "Setting → Base → Camera → GenICam → Analog Control → Balance White Auto". Just select "Continuous" and you will get a white balanced image.
For older devices, ImpactControlCenter offers predefined settings for e.g.
- "Daylight",
- "TungstenLamp",
- "HalogenLamp",
- "FluorescentLamp" and many more.
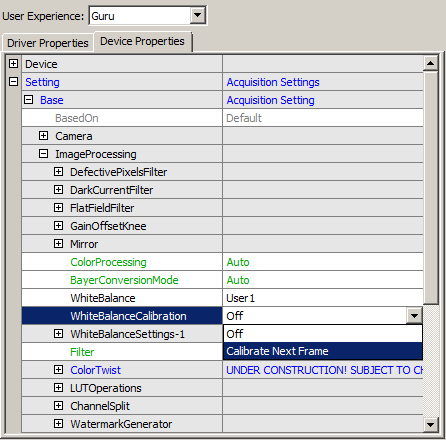
Simply select the necessary item in the menu "Image Settings → Base → ImageProcessing → WhiteBalance" (DeviceSpecific interface layout) or "Setting → Base → ImageProcessing → WhiteBalance" (GenICam interface layout).
If you need a user defined setting, you can also define own ones. For this, select a profile (e.g. User1) for this setting:
- Note
- You can use up to 4 profiles.
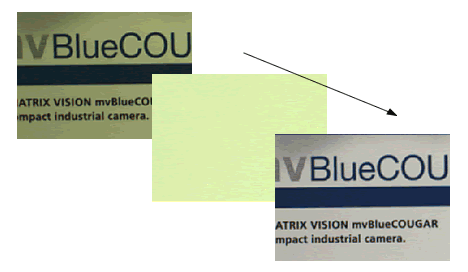
Point the camera on a white or light gray area (the pixels do not have to be saturated, so use gray values between 150 and 230).
Go to the menu item "WhiteBalanceCalibration" and select the parameter "Calibrate Next Frame":
By committing the selected value, the application accepts the change. The next acquired image will be the reference for the white balance.
All further acquired images will be balanced with this setting:
For easier handling and easier working, all settings can be saved by clicking the menu Action → Capture Settings → Save ....
Optimizing White Balance In The Camera
The gain is increased before the digital white balancing, which uses green as reference. Based on the 14 bit image raw data, the digital white balance adjusts the gain of red and blue. Afterwards, the 8 bit reducing and the transfer takes place.
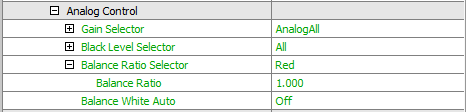
To optimize the digital white balance within the camera you can select "Red" or "Blue" in "Balance Ratio Selector" (in "Analog Control") to adjust the gain. Afterwards, turn "Balance White Auto" to "Off" and "Once" to execute it.