Loading...
Searching...
No Matches
Working with the I2C interface (mv I2C Interface Control)
Introduction
As mentioned in GenICam And Advanced Features section of this manual, the mv I2C Interface Control is a feature which allows to communicate with custom-specific peripherals via I2C.
Setting up the device
Follow these steps to prepare the camera for the communication via I2C:
- Start ImpactControlCenter
- Connect to the camera
-
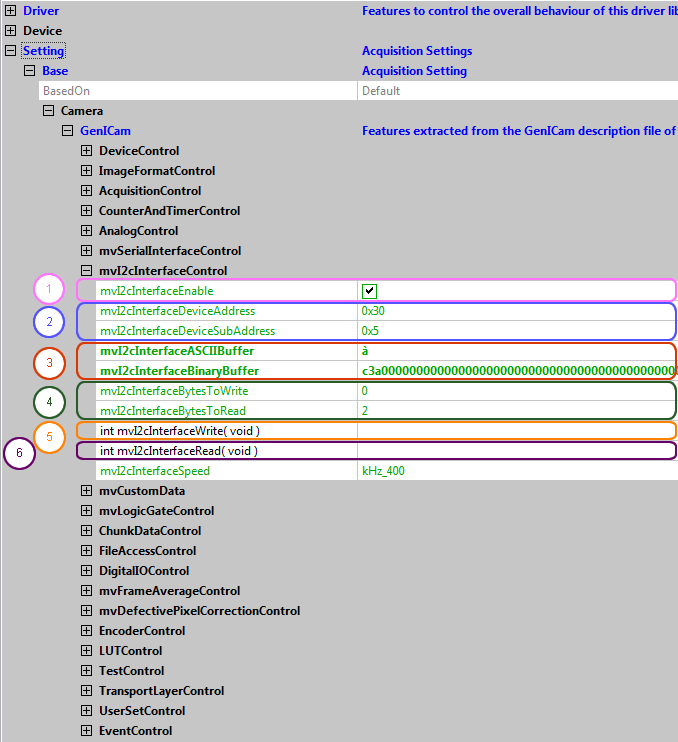
Under "Setting → Base → Camera → GenICam → mv I2c Interface Control" activate the serial interface by enabling
"mv I2C Interface Enable" (1).
Afterwards "mv I2C Interface Control" is available. -
Set up the connection settings to your needs (2).
E.g. to get the temperature of the sensor set "mv I2C Interface Device Address", depending on the device, either to "0x30" or "0x32".
Afterwards there are two ways to set the resolution of the temperature value (0.5°C [0], 0.25°C [1], 0.125°C [2], or 0.0625°C [3]):
Using the BinaryBuffer:- Set "mv I2C Interface Device Sub Address" to "0x08".
- Set "mv I2C Interface Binary Buffer" e.g. to "1" i.e. 0.25°C (3).
- Set "mv I2C Interface Bytes To Write" to "1" to send one byte from the binary buffer (4).
- Send messages by executing the function "int mvI2CInterfaceWrite( void )" by either clicking on the 3 dots next to the function name or by right-clicking on the command and then selecting Execute from the context menu.(5)
Without the BinaryBuffer (which is faster):- Set "mv I2C Interface Device Sub Address" to "0x10801" i.e. 0x1xxxx means 16Bit SubAddress; message: register 8 to 1 (resolution 0.25°C).
- Disable the "mv I2C Interface Bytes To Write" using "0" (4).
- Send messages by executing the function "int mvI2CInterfaceWrite( void )" by either clicking on the 3 dots next to the function name or by right-clicking on the command and then selecting Execute from the context menu.(5)
You can now read the temperature the following way:
- Set "mv I2C Interface Device Sub Address" to "0x05".
- Set "mv I2C Interface Bytes To Read" to "0x02", i.e. two bytes.
- Send messages by executing the function "int mvI2CInterfaceRead( void )" by either clicking on the 3 dots next to the function name or by right-clicking on the command and then selecting Execute from the context menu.(6)
Programming the I2C interface
#include <mvIMPACT_CPP/mvIMPACT_acquire_GenICam.h>

  // more code

  GenICam::mvI2cInterfaceControl iic( pDev );
  iic.mvI2cInterfaceEnable.write( bTrue );
  iic.mvI2cInterfaceSpeed.writeS("kHz_400");
  iic.mvI2cInterfaceDeviceAddress.write("0x30");

  // Set the I2C communication

  // Using the BinaryBuffer
  iic.mvI2cInterfaceDeviceSubAddress.write(0x08);
  pWrBuf[0] = 1;
  iic.mvI2cInterfaceBinaryBuffer.writeBinary(pWrBuf);
  iic.mvI2cInterfaceBytesToWrite.write("1");
  iic.mvI2cInterfaceWrite.call();

  // Without BinaryBuffer
  iic.mvI2cInterfaceDeviceSubAddress.write("0x10800");
  iic.mvI2cInterfaceBytesToWrite.write("0");
  iic.mvI2cInterfaceWrite.call();

  // Read the temperature

  iic.mvI2cInterfaceDeviceSubAddress.write("0x05");
  iic.mvI2cInterfaceBytesToRead.write("0x02");
  iic.mvI2cInterfaceRead.call();

  i2cReadBinaryData = iic.mvI2cInterfaceBinaryBuffer.readBinary();

  // more code
- See also
- GenICamI2cUsage.cs sample in the sample folder of the Impact Acquire SDK installation.