Loading...
Searching...
No Matches
Using motorized lenses with BVS CA-GX2
Introduction
In contrast to machine vision applications with constant lightings and fixed focal lengths, outdoor applications such as traffic monitoring, security, or sports demand to control image brightness, field of view, zoom, focus, or iris. Lenses with motors offer the possibility to remotely manipulate these settings and the BVS CA-GX2 offers the possibility to control motorized lenses.
Types of motorized lenses and their controls
Motorized lenses differ by the fact what element is motorized and how:
- Zoom
- Focus
- Iris
- Motor
- Video
- DC
Lenses with motors differ by the voltage they accept and by certain wiring specialties. Driving voltages may be between 3 and 12V DC, wiring may be 2 wires per motor (a.k.a. bipolar) or with one wire per motor and common ground. Some lenses offer potentiometers so that the actual position can be measured by a resistance. These potentiometers are not supported by the BVS CA-GX2 camera.
List of usable lenses
Motorized lenses differ by the max. sensor diameter they support and by resolution limits. BVS CA-GX2 cameras use sensors with 2/3" to 1" diameter. Lens/camera combinations must be selected having these properties in mind. The following is a list of usable lenses. It is provided for reference only. Exclusion from this list does not mean that the product is not usable with the camera per se.
| Manufacturer | Details | Motorized Iris | Motorized Focus | Motorized Zoom | Video Iris |
| KOWA | Motorized LMZ-series up to 1" and 5 MPix resolution | X | X | X | X |
| Goyo Optical | GAZ series 2/3" – 1" | X | X | X | |
| Linos | Mevis motorized | X | X | ||
| Schneider Optics | Cinegon/Xenoplan: motorized iris | X | X | ||
| Computar | 2/3" M6Z series | X | X | X | |
| Fujinon | 2/3" and 1" lenses | X | X | X | X |
Connecting the motorized lens to a camera
Connecting the direct drive lens motors
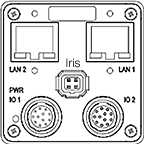
BVS CA-GX2 offers two connectors at the back. Use the female one on the right side for lens connection. Pinning is shown in the table on the left side below:
| Female connector | |
| Pin. | Signal |
| 1 | Opto DigIn2 (line6) |
| 2 | Opto GND |
| 3 | Opto DigIn3 (line7) |
| 4 | Focus+ |
| 5 | Focus- |
| 6 | Zoom+ |
| 7 | Zoom- |
| 8 | Iris+ |
| 9 | Iris- |
| 10 | Channel4+ |
| 11 | Channel4- |
| 12 | GND |
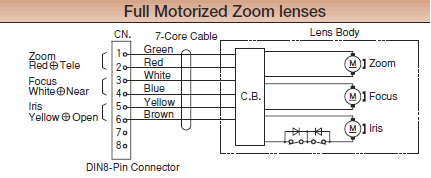
Image above shows a typical lens wiring. The three independent motors can be seen.
- Connect Pin4 (Focus+) to CN Pin4.
- Connect Pin5 (Focus-) to CN Pin3.
- etc.
BVS CA-GX2 can deliver up to 100mA current with a selectable voltage to the outputs Focus, Zoom and Iris. Please note that the voltage applied is independent of the supply voltage of the camera. Channel 4 can be left open.
Connecting the video iris
BVS CA-GX2 camera generates a video like signal containing average brightness information and sync signals to drive a video iris type lens. The diaphragm of the lens closes at increasing brightness keeping the resulting overall brightness reaching the sensor constant.
Advantage of video iris against AutoExposure: Bigger range of brightness variation avoids smear in CCD as it blocks extreme bright light to hit the sensor; but is slower than AutoExposure and AutoGain which is also supported by the camera. Pining of the standardized video iris connector (4 pin EIAJ) is shown below.
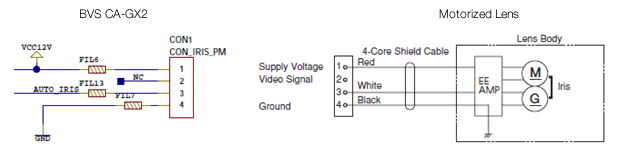
Use the square 4 pin iris connector of the camera to directly connect the video iris.
Controlling the lens via viewer or the API (aka Impact Acquire)
Usage of the lens control wizard of ImpactControlCenter is recommended for setup:
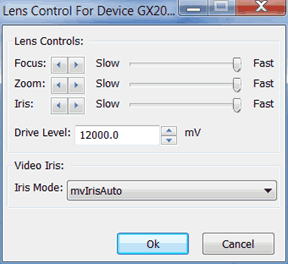
Select the "Drive Level" voltage according to the lens type. Focus, Zoom and Iris buttons drive the motors at a selectable speed.
"Video Iris" can be selected to open or completely close the Iris (for setup) and for auto mode.
- Note
- Additional settings such as level (sensitivity) and/or ALC (peak or average) may be possible directly at the lens (via poti).
ALC settings do not have effect due to digital video signal!
Consult the manual of the lens for more details.
Using AGC/AEC & mvIrisAuto may lead to oscillating brightness.
Setting the video iris (example)
Purpose is to bring the video iris into a usable range so that during operation it can open if brightness goes down and further close if brightness goes up.
- Open iris by using mvIrisOpen command: This opens iris to the min. F number (f/N) supported by the lens, e.g. f/1.2 (see lens manual).
- Set exposure of camera so that the image is not saturated.
- Set exp = 4 x min.
- Iris auto will move the lens to f/2.4.
- Set working exposure = 16 X min will move the Iris auto to f/4.8.
Controlling the lens via 3rd party libraries or APIs
The properties for "mv Lens Control" are Balluff/MATRIX VISION specific but appear in the camera’s XML-file according to GigE Vision standards and SFNC thanks to the standard. This makes it possible to use the features from third party applications or programs without problems.
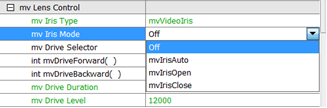
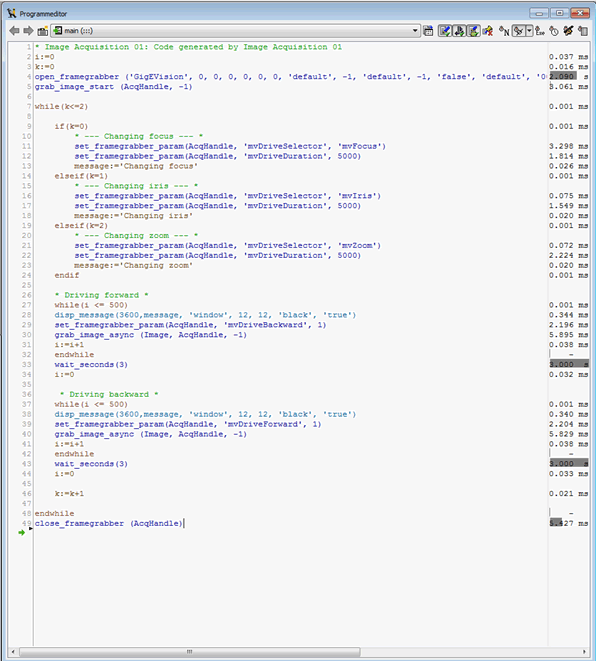
The screenshot below shows how the properties appear under MVTec HALCON’s image acquisition assistant:
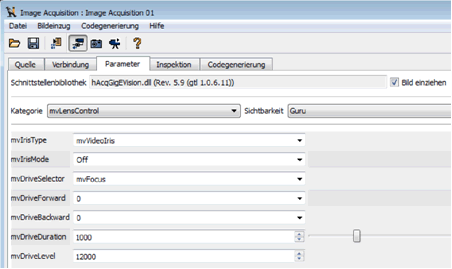
The next screenshot shows the respective HDevelop example under Halcon for the same settings: