Loading...
Searching...
No Matches
GenICam™ GenTL Device Specific
- Note
- This section applies to all GigE Vision™ as well as all USB3 Vision™ devices and all BVS CA-GT, BVS CA-GX (mvBlueCOUGAR-X), BVS CA-SF (mvBlueFOX3), BVS CA-BN and mvBlueCOUGAR-S devices in particular.
For all GenICam™ based devices the following files will be necessary:
- mvGenTLConsumer.dll can be copied somewhere in the systems path or into the applications directory
In case of mvUSB3Vision or GigE Vision™ devices:
- mvGenTLProducer.cti can be copied somewhere in the systems path or into a directory the corresponding GENICAM_GENTL environment variable is pointing to.
In case of BVS CA-BN devices:
- mvGenTLProducer.PCIe.cti can be copied somewhere in the systems path or into a directory the corresponding GENICAM_GENTL environment variable is pointing to.
- BVS_CA-BN.[some letter].[0-3].dll can be copied somewhere in the systems path or into the directory mvGenTLProducer.PCIe.cti resides in.
For the GenICam cache it is necessary to make use of the environment variable MVIMPACT_ACQUIRE_DATA_DIR which will be used to store data like the log files generated by Impact Acquire, firmware update files or the GenICam cache. The variable has to be defined to a directory with the following structure:
%MVIMPACT_ACQUIRE_DATA_DIR%
|- FirmwareUpdates (optional)
|- GenICam
| |- CacheV<major>_<minor>
|- logs (optional)
|- CameraFiles <-- Needed for frame grabber (deprecated) boards only
- Note
- More information about locations of libraries within the standard installation is summarized at Locating Runtime Libraries.
- Attention
- Regarding all the kernel driver related information discussed in the technology specific sections from here onwards it is essential to understand the impact of what is described here as well! Not doing so will result in a corrupted system (e.g. in problems like this)!
GigE Vision™ Device Specific (Windows® 8 And Newer)
If the GigE Vision™ capture filter kernel-mode driver shall be used the following files must be shipped as well:
For 64-bit support:
- mvGigECapture2.inf
- mvGigECapture2_amd64.cat
- mvGigECapture2.sys
GigE Vision™ Device Specific (Common Installation)
To actually install the GigE Vision™ capture filter driver on the system there are 3 ways to go: Either the tool GigEConfigure or the built-in mechanism of Windows® to install a filter driver can be used.
Using GigEConfigure there are 2 possibilities:
- By using the command-line options available for the tool. For details please have a look into the GigEConfigure section in the Impact Acquire SDK GUI Applications-manual, chapter "Command-line Interface".
- The user interactive version by simply starting the tool and then clicking Install driver or Remove driver and/or by right-clicking on a network connection entry to enable/disable the GigE Vision™ capture filter driver.
- Note
- More details regarding the usage of GigEConfigure can be found at the corresponding chapter within the Impact Acquire SDK GUI Applications-manual (here).
Using the built-in mechanism of Windows® works like this:
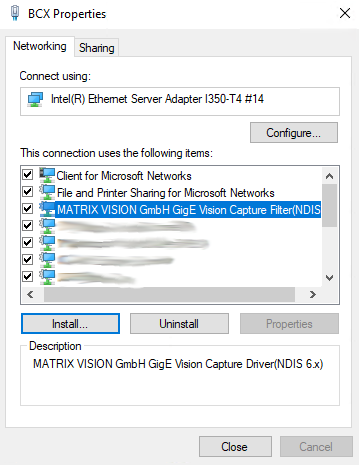
First navigate to any of the network connections available to the system and open the properties dialog of that connection.
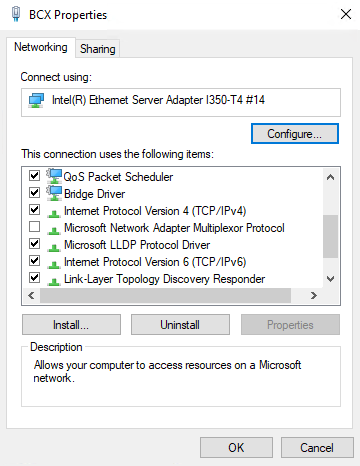
Here click on Install...
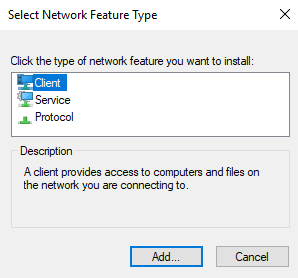
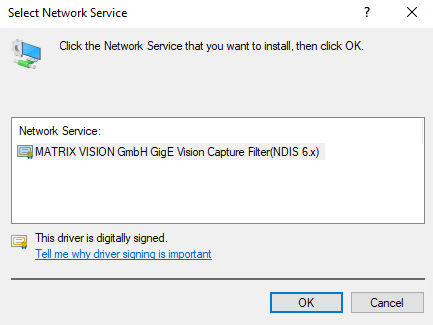
In the next Windows® select Service and click on Add....
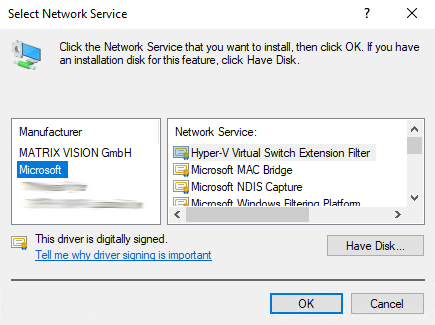
Now click on Have Disk....
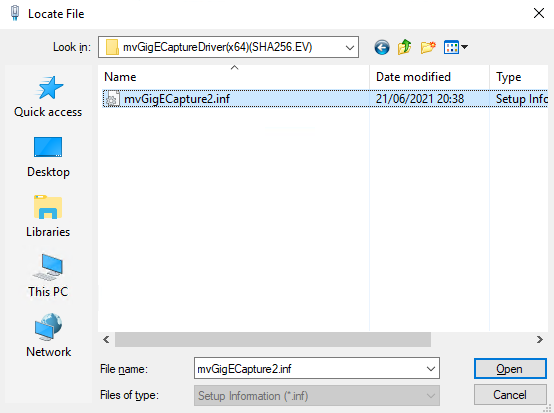
Click on Browse... and navigate to the folder containing the GigE Vision™ capture filter kernel-mode driver files mentioned above.
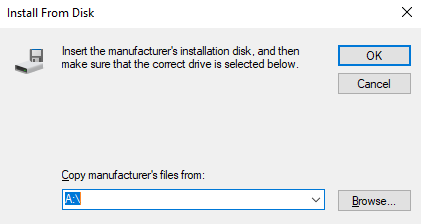
Select the file mvGigECapture.inf and click on Open
Click on OK
- Note
- Depending on the amount of network connections installed in your system and depending on the version of Windows® you are working with a couple of warnings might appear that must be confirmed with something like Continue anyway.
Afterwards the GigE Vision™ capture filter driver will installed and active on EVERY network connection of the system. If that is not desired, it can be enable and disabled from the properties dialog of the network connection that shall be modified by checking or unchecking the box in from of the Balluff Impact Acquire filter driver entry.
GigE Vision™ Device Specific (Registry Based Installation)
The third approach is a possibility provided by the functionality of the mvGenTLProducer.cti which allows to install the GigE Vision™ capture filter driver using the Impact Acquire API. At first there are some values which have to be written to the Registry of Windows® to specify the GigE Vision™ support and the path to the GigE Vision™ filter driver which shall be installed
The entry HKEY_LOCAL_MACHINE/SOFTWARE/Balluff/Settings has to be generated and afterwards the keys from the following table have to be created.
| Name | Type | Value |
|---|---|---|
GEV_SUPPORT | DWORD | 1 |
GEV_DRIVER_SOURCE_PATH | String | MVIMPACT_ACQUIRE_DIR%\KernelDrivers\mvGigECaptureDriver(x64)(SHA256.EV)\mvGigECapture2.inf |
- Note
- The
GEV_DRIVER_SOURCE_PATHmight differ depending on the source of the kernel driver files. See General Considerations When Shipping Kernel Drivers as well. Afterwards some small application needs to load the requiredTLIMV_InstallDriverFromRegistryfunction from mvGenTLProducer.cti. The following code shows how this would work:
#include <windows.h>
int main( void )
{
typedef void ( *TLIMV_InstallDriverFromRegistry )( void );
HINSTANCE hDLL = LoadLibrary( "<path to mvGenTLProducer.cti>" );
TLIMV_InstallDriverFromRegistry installDriverFromRegistry = ( TLIMV_InstallDriverFromRegistry ) GetProcAddress( ( HMODULE ) hDLL, "TLIMV_InstallDriverFromRegistry" );
installDriverFromRegistry();
};
- Note
- As the function will install the GigE Vision™ capture filter driver and access the
HKEY_LOCAL_MACHINEentries, the application utilizing this functionality needs to be called with administrator permissions. Of course this cannot only be done using a C/C++ application as shown here but also by any other mechanism that can write to the Registry and can call a DLL function that doesn't require parameters. So this can also be done from within a WiX installation package or some C# application for example.
USB3 Vision™ Device Specific
For USB3 Vision™ device support the following files correctly signed for the target platform must be shipped as well:
For 64-bit support:
- mvUSB3Vision.inf
- mvUSB3Vision.cat
- x86/libusbK_x86.dll
- x86/libusb0_x86.dll
- amd64/libusbK.sys
- amd64/libusbK.dll
- amd64/libusb0.dll
- amd64/WdfCoInstaller01009.dll
- Attention
- The relative folder structure is vital! Installation of the kernel module will fail if this does not match!
Experienced users are encouraged to use the Microsoft Driver Install Framework for applications to deploy this driver on the target system (http://msdn.microsoft.com/en-us/library/ms790295.aspx). This is the recommended way for installing device drivers.
BVS CA-BN Device Specific
For BVS CA-BN device support the following files correctly signed for the target platform must be shipped as well:
For 64-bit support:
- mvBlueNAOS.inf
- mvBlueNAOS.cat
- mvBlueNAOS.sys
Experienced users are encouraged to use the Microsoft Driver Install Framework for applications to deploy this driver on the target system (http://msdn.microsoft.com/en-us/library/ms790295.aspx). This is the recommended way for installing device drivers.
GenICam™ Runtime
Apart from that, the GenICam™ runtime this framework has been linked with must be installed on the target system. The runtime modules are contained in the merge modules belonging to this installation package.
The framework will try to locate the GenICam™ runtime in %MVIMPACT_ACQUIRE_DIR%/Toolkits/GenICam_v<major>_<minor> thus if you plan to distribute the runtime in a different way you need to setup you environment accordingly as described by the GenICam™ standard.