Loading...
Searching...
No Matches
GenICam™ To Impact Acquire Code Generator
- Note
- This section applies to the GenICam™ GenTL related Impact Acquire libraries only!
Using The Code Generator
As any GenICam™ compliant device for which there is a GenICam™ GenTL compliant capture stack in Impact Acquire can be used using the Impact Acquire interface and it can't be known which features are supported by a device until a device has been initialised and its GenICam™ XML file has been processed it is not possible to provide a complete C++ wrapper for every device statically.
Therefore an interface code generator has been embedded into mvGenTLConsumer library. This code generator can be used to create a convenient C++ interface file that allows access to every feature offered by a device.
- Note
- This generated interface can result in incompatibility issues, because the interface name will be constructed from the version and product information that comes with the GenICam™ XML file (see comment in code sample below). To avoid incompatibility, please use the common interface from the namespace mvIMPACT::acquire::GenICam whenever possible. It always contains all the features defined by the SFNC (Standard Features Naming Convention(https://www.emva.org/standards-technology/genicam/genicam-downloads/))which was available at the time of the Impact Acquire release as well as all Balluff specific features. Needed custom features for third party devices can easily be either added to existing class by deriving from them or by writing a small wrapper class for custom categories of features. In the latter case one of the existing class wrapping SFNC feature access can be used as a blueprint. The full source code is available in the corresponding header file. It is fairly easy to do!
To access features needed to generate a C++ wrapper interface a device needs to be initialized. Code can only be generated for the interface layout selected when the device was opened. If interfaces shall be created for more than a single interface layout the steps that will explain the creation of the wrapper files must be repeated for each interface layout.
- Note
- In a single application it rarely makes sense to work with the same device with multiple interface layouts!
Once the device has been opened the code generator can be accessed by navigating to "System Settings → CodeGeneration".
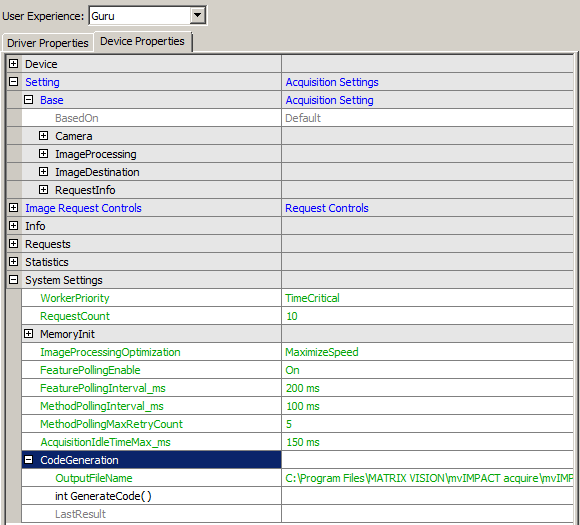
To generate code first of all an appropriate file name should be chosen. In order to prevent file name clashes the following hints should be kept in mind when thinking about a file name:
- If several devices from different families or different vendors shall later be included into an application each device or device family will need its own header file thus either the files should be organized in different subfolders or must have unique names.
- If a device shall be used using different interface layouts again different header files must be generated.
If only a single device family is involved but 2 interface layouts will be used later a suitable file name for one of these files might be mvIMPACT_acquire_GenICam_Wrapper_DeviceSpecific.h.
For a more complex application involving different device families using the GenICam™ interface layout only something like this might make sense:
- mvIMPACT_acquire_GenICam_Wrapper_MyDeviceA.h
- mvIMPACT_acquire_GenICam_Wrapper_MyDeviceB.h
- mvIMPACT_acquire_GenICam_Wrapper_MyDeviceC.h
- ...
Once a file name has been selected the code generator can be invoked by executing the "int GenerateCode()" method:
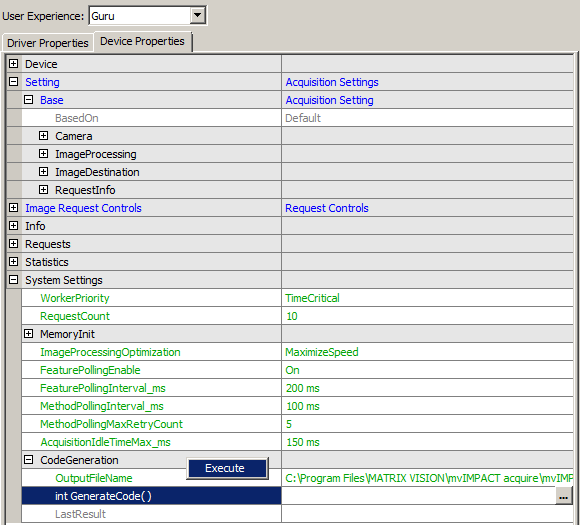
The result of the code generator run will be written into the LastResult property afterwards:

Using The Result Of The Code Generator In An Application
Each header file generated by the code generator will include "mvIMPACT_CPP/mvIMPACT_acquire.h" thus when an application is compiled with files that have been automatically generated these header files must have access to this file. This can easily achieved by appropriately settings up the build environment / Makefile.
To avoid problems of multiple includes the file will use an include guard build from the file name.
Within each header file, the generated data types will reside in a sub namespace of mvIMPACT::acquire in order to avoid name clashes when working with several different created files in the same application. The namespace will automatically be generated from the ModelName tag and the file version tags in the device's GenICam™ XML file and the interface layout. For a device with a ModelName tag mvBlueIntelligentDevice and a file version of 1.1.0 something like this will be created:
namespace mvIMPACT {
namespace acquire {
namespace DeviceSpecific { // the name of the interface layout used during the process of code creation
namespace MATRIX_VISION_mvBlueIntelligentDevice_1 { // this name will be constructed from the version and product
// information that comes with the GenICam XML file. As defined
// by the GenICam standard, different major versions of a devices
// XML file may not be compatible thus different interface files should be created here
// all code will reside in this inner namespace
} // namespace MATRIX_VISION_mvBlueIntelligentDevice_1
} // namespace DeviceSpecific
} // namespace acquire
} // namespace mvIMPACT
Definition mvImageBuffer.h:42
In the application the generated header files can be used like any Impact Acquire header file:
#include <string>
// #include <mvIMPACT_CPP/mvIMPACT_acquire.h> // no longer needed as this is included by the generated header file anyway!
#include <mvIMPACT_CPP/mvIMPACT_acquire_GenICam_Wrapper_DeviceSpecific.h>
Now to access data types from the header files of course the namespaces must somehow be taken into account. When there is just a single interface that has been created automatically the easiest thing to do would probably an appropriate using statement:
using namespace mvIMPACT::acquire::DeviceSpecific::MATRIX_VISION_mvBlueIntelligentDevice_1;
If several files created from different devices shall be used and these devices define similar features in a slightly different way this however might result in name clashes and/or unexpected behaviour. In that case the namespaces should be specified explicitly when creating data type instances from the header file in the application:
//-----------------------------------------------------------------------------
void fn( Device* pDev )
//-----------------------------------------------------------------------------
{
mvIMPACT::acquire::DeviceSpecific::MATRIX_VISION_mvBlueIntelligentDevice_1::DeviceControl dc( pDev );
if( dc.timestampLatch.isValid() )
{
dc.timestampLatch.call();
}
}
When working with a using statement the same code can be written like this as well:
//-----------------------------------------------------------------------------
void fn( Device* pDev )
//-----------------------------------------------------------------------------
{
DeviceControl dc( pDev );
if( dc.timestampLatch.isValid() )
{
dc.timestampLatch.call();
}
}