Introduction
Look-Up-Tables (LUT) are used to transform input data into a desirable output format. For example, if you want to invert an 8 bit image, a Look-Up-Table will look like the following:
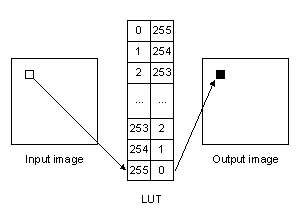
I.e., a pixel which is white in the input image (value 255) will become black (value 0) in the output image.
All Balluff/MATRIX VISION devices use a hardware based LUT which means that
- no host CPU load is needed and
- the LUT operations are independent of the transmission bit depth.
Setting the hardware based LUTs via LUT Control
On the BVS CA-SF using ImpactControlCenter, you will find the LUT Control via "Setting → Base → Camera → GenICam → LUT Control".
ImpactControlCenter offers a wizard for the LUT Control usage:
-
Click on "Setting → Base → Camera → GenICam → LUT Control".
Now, the "Wizard" button becomes active.
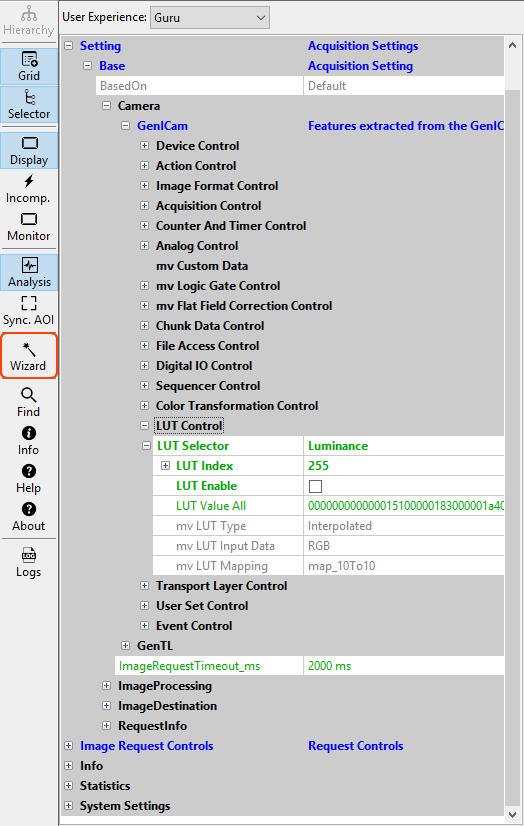
Figure 2: ImpactControlCenter - LUT Control wizard button
-
Click on the "Wizard" button to start the LUT Control wizard tool.
The wizard will load the LUT data from the camera.
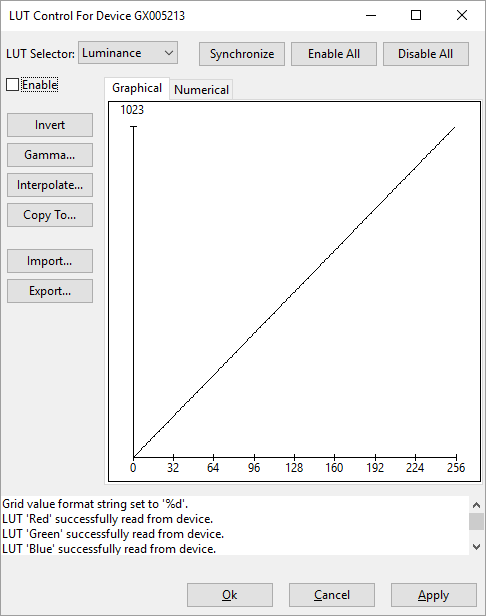
Figure 3: ImpactControlCenter - LUT Control wizard dialog
It is easy to change settings like the Gamma value of the Luminance or of each color channel (in combination with a color sensor of course) with the help of the wizard. You can also invert the values of each pixel with the wizard. It is not possible to set a LUT mode and the "mv LUT Mapping" is fixed.
Make your changes and do not forget to
- click on "Copy to..." and select "All" or the color channel you need, to
- click on "Enable All", and finally, to
- click on Synchronize and play the settings back to the device (via "Cache → Device").
- Note
- If you select "Enable All" without entering any value the image will be inverted.
Setting the Host based LUTs via LUTOperations
Host based LUTs are also available via "Setting → Base → ImageProcessing → LUTOperations"). Here, the changes will affect the 8 bit image data and the processing needs the CPU of the host system.
Three "LUTMode"s are available:
- "Gamma"
You can use "Gamma" to lift darker image areas and to flatten the brighter ones. This compensates the contrast of the object. The calculation is described here. It makes sense to set the "GammaStartThreshold" higher than 0 to avoid a too extreme lift or noise in the darker areas. - "Interpolated"
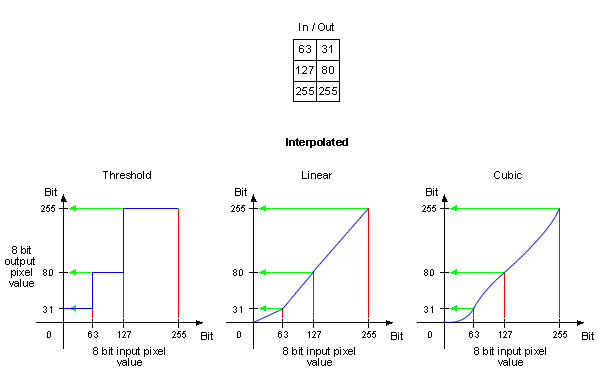
With "Interpolated" you can set the key points of a characteristic line. You can defined the number of key points. The following figure shows the behavior of all 3 LUTInterpolationModes with 3 key points:
- "Direct"
With "Direct" you can set the LUT values directly.
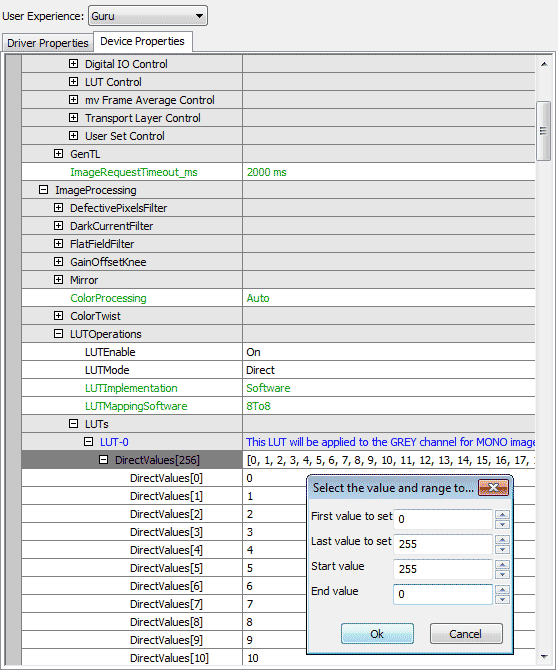
Example 1: Inverting an Image
To get an inverted 8 bit mono image like shown in Figure 1, you can set the LUT using ImpactControlCenter. After starting ImpactControlCenter and using the device,
- Set "LUTEnable" to "On" in "Setting → Base → ImageProcessing → LUTOperations".
- Afterwards, set "LUTMode" to "Direct".
-
Right-click on "LUTs → LUT-0 → DirectValues[256]" and select "Set Multiple Elements... → Via A User Defined Value Range".
This is one way to get an inverted result. It is also possible to use the "LUTMode" - "Interpolated". - Now you can set the range from 0 to 255 and the values from 255 to 0 as shown in Figure 2.