- Since
- Firmware version 2.18.651.0
Introduction
A special feature of Pregius sensors (a.k.a. IMX) from Sony is the possibility to define multiple AOIs (Areas of Interests - a.k.a. ROI - Regions of Interests) and to transfer them at the same time. Because many applications just need one or several specific parts in an image to be checked, this functionality can increase the frame rate.
Once activated, the "mv Multi Area Mode" allows you, depending on the sensor, to define up to eight AOIs (mvArea0 to mvArea7) in one image. There are several parameters in combination with the AOIs which are illustrated in the following figure:
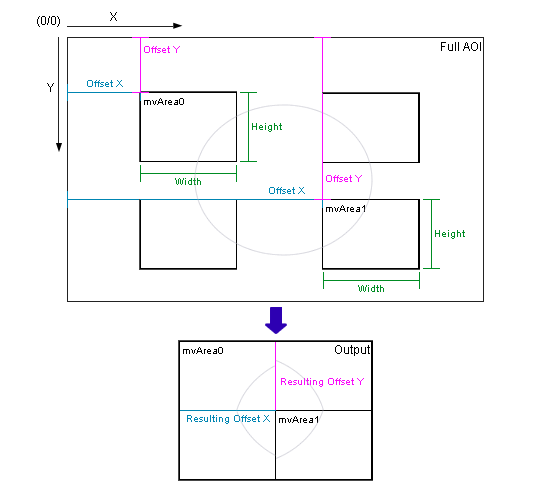
The "Resulting Offset X" and "Resulting Offset Y" indicates the starting point of the specific AOI in the output image. To complete the rectangular output image, the "missing" areas are filled up with the image data horizontally and vertically. We recommend to use the wizard as a starting point - the wizard provides a live preview of the final merged output image.
Using ImpactControlCenter
To create multiple AOIs with ImpactControlCenter, you have to do the following step:
- Start ImpactControlCenter and
- connect to the camera.
-
Then change in "Setting → Base → Camera → GenICam → Image Format Control" the
"mv Multi Area Mode"
to "mvMultiAreasCombined".
Afterwards, "mv Area Selector" is available. - Now, select the area a.k.a. AOI you want to create via "mv Area Selector", e.g. "mvArea3" and
- set the parameters "mv Area Width", "mv Area Height", "mv Area Offset X", and "mv Area Offset Y" to your needs.
-
Activate the area a.k.a. AOI by checking the box of "mv Area Enable".
Figure 2: ImpactControlCenter - Multiple AOIs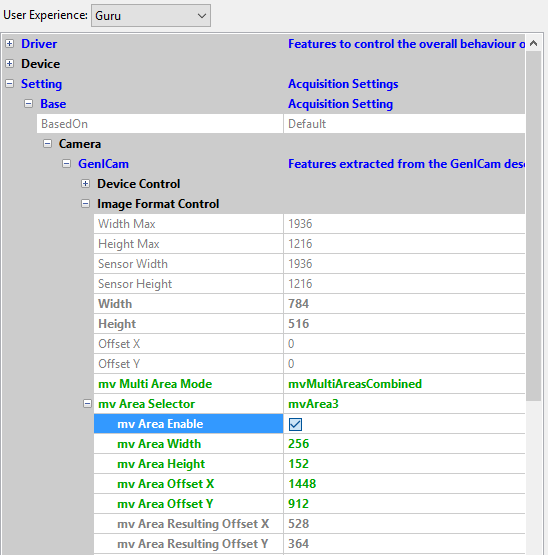
- Finally, start the acquisition by clicking the button "Acquire".
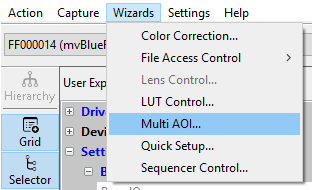
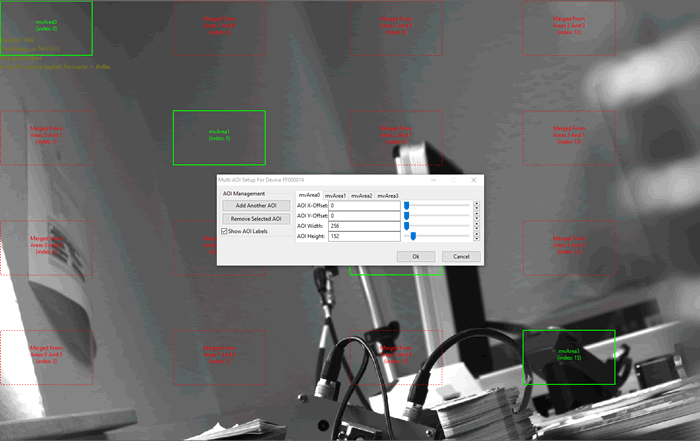
Using the Multi AOI wizard
Since version 2.19.0 ImpactControlCenter offers a wizard for the Multi AOI usage:
The wizard can be used to get a comfortable overview about the settings of the AOIs and to create and set the AOIs in a much easier way:
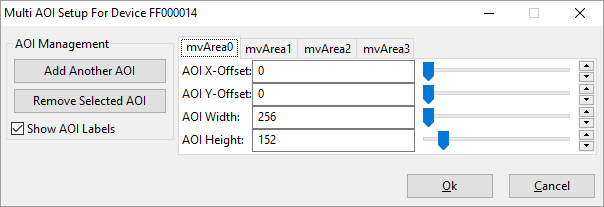
Just
- select the desired mvArea tabs,
- set the properties like offset, width, and height in the table directly, and
- confirm the changes at the end using the Ok button.
The live image shows the created AOIs and the merged or "missing" areas which are used to get the final rectangular output image.
Programming multiple AOIs
#include <mvIMPACT_CPP/mvIMPACT_acquire.h>
#include <mvIMPACT_CPP/mvIMPACT_acquire_GenICam.h>

...
    GenICam::ImageFormatControl ifc( pDev );
    ifc.mvMultiAreaMode.writeS( "mvMultiAreasCombined" );
    ifc.mvAreaSelector.writeS( "mvArea0" );
    ifc.mvAreaEnable.write( bTrue );
    ifc.mvAreaOffsetX.write( 0 );
    ifc.mvAreaOffsetY.write( 0 );
    ifc.mvAreaWidth.write( 256 );
    ifc.mvAreaHeight.write( 152 );
    ifc.mvAreaSelector.writeS( "mvArea1" );
    ifc.mvAreaEnable.write( bFalse );
    ifc.mvAreaSelector.writeS( "mvArea2" );
    ifc.mvAreaEnable.write( bFalse );
    ifc.mvAreaSelector.writeS( "mvArea3" );
    ifc.mvAreaEnable.write( bTrue );
    ifc.mvAreaOffsetX.write( 0 );
    ifc.mvAreaOffsetY.write( 0 );
    ifc.mvAreaWidth.write( 256 );
    ifc.mvAreaHeight.write( 152 );
    ifc.mvAreaOffsetX.write( 1448 );
    ifc.mvAreaOffsetY.write( 912 );
...