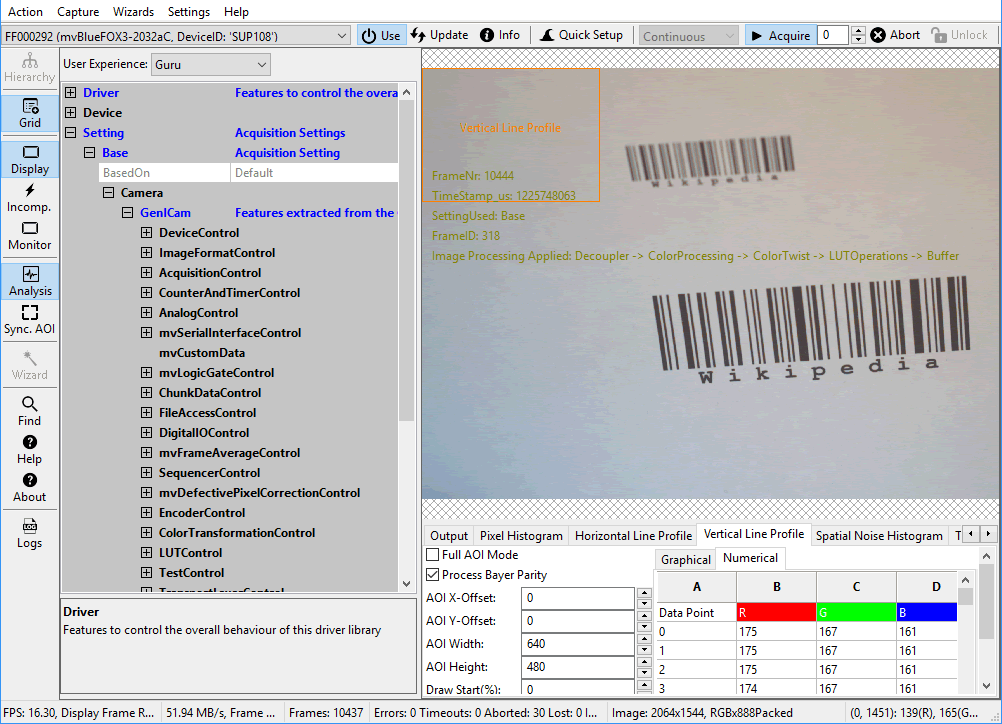
As described earlier, each device currently recognized will be listed in the drop down menu in the upper left corner of the "Upper Tool Bar". When this is the first time you start the application after the system has been booted this might take some seconds when working with devices that are not connected to the host system via PCI or PCIe.
Once you have selected the device of your choice from the drop down menu click on the "Use" button to open it.
When the device has been opened successfully, the remaining buttons of the dialog will become enabled!
- Note
- "Frame grabber devices": Before you can capture data make sure that
- a suitable camera has been connected to the grabber
- the correct input channel has been selected
- a suitable camera description (an XML file selected with the property "Image Settings → Camera → Type" in The Property Grid) has been selected. If you do not have an description, please have a look at Working With Camera Descriptions to see, how to generate one.
Now, you can capture an image ("Acquisition Mode": "SingleFrame") or display live images ("Continuous"). Just
- select an "Acquisition Mode" e.g. "SingleFrame" and
- click the "Acquire" button.
- Note
- How to capture image data and configure a device from a custom application is described in great detail in the corresponding Impact Acquire API manuals for the programming language of your choice.

Three different acquisition modes are available:
- Continuous ("Live mode")
- MultiFrame ("A sequence of defined length")
- SingleFrame ("The acquisition of a single image")
The frame rate depends on
- the camera or sensor in combination with the transmission technology,
- the pixel clock of the sensor(defining the read-out speed of the device), and
- the "Acquisition Frame Rate".
If you want to have a fixed frame rate using the "Continuous" mode, for some "GenICam" compliant devices the property "Setting → Base → Camera → GenICam → Acquisition Control → Acquisition Frame Rate" will be supported
Alternatively, if you need frame rates below 5 fps, you can use Timers.
- See also
- GenICam™ Standard Features Naming Convention (SFNC)(https://www.emva.org/standards-technology/genicam/)
- product manuals (https://www.balluff.com/en-de/online-manuals-mv). Here for example the use case "Creating synchronized acquisitions using timers", where a frame rate of 1 fps is generated.
- Note
- For color sensors, it is recommended to perform a white balance calibration now. This will improve the quality of the resulting images significantly.
Storing The Current Image
- Since
- Version 2.37.0 of this application
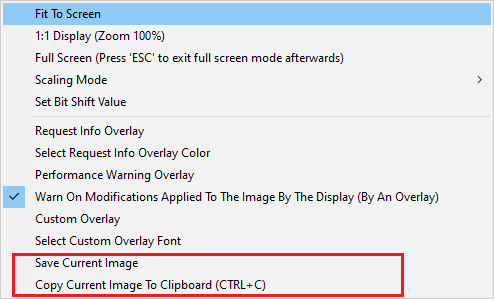
To save an image directly from the live display directly, just
- Right-click on the display.
- Either select "Save Current Image" or "Copy Current Image To Clipboard".
With "Save Current Image" a dialog will appear, where you can specify the destination folder and the file format.
With "Copy Current Image To Clipboard" you can open you preferred image editing tool an paste the clipboard into it. For this functionality you can also use the shortcuts CTRL-C and CTRL-V.

