Impact Acquire's internals are built using CMake (https://cmake.org/) and the public interface as well as the example applications are shipped with CMake support as well. Therefore the recommended way of building the example applications or any code based on the Impact Acquire SDK is by using CMake as well.
For those not knowing CMake at all please refer to the CMake website and read about it. In short it is a build system or a tool that can generate Makefiles or e.g. Visual Studio project files. It is a great tool for those who don't want to manually edit makefiles and for those who don't like to maintain makefiles for a wide range of compilers, IDEs and platforms for a single project. At the time of writing Impact Acquire was shipped with Visual Studio 2013 example project files. However by using CMake you can generate Visual Studio or GNU Makefiles matching your compiler version for the example application very easy.
CMake? Never heard of it...
CMake is a build system. It is a set of tools which can be used to generate makefiles or e.g. Visual Studio project files for a wide range of compilers.
- Note
- There are lots of other things you can do with the CMake package but this is beyond the scope of this document.
To tell CMake what and how to generate makefiles a user needs to write configuration files understood by CMake. A big advantage of CMake is that e.g. a user does no longer need to understand the complicated internals of makefiles, that you no longer need to convert Visual Studio project files from one version to another and that you can build 'out of tree' very easily so you can keep your source tree completely free of build artifacts allowing faster searches etc. within your code. For more information refer to the CMake website: https://cmake.org/
The source code shipped with Impact Acquire comes with CMake support files. When you want to build or modify the example code using a compiler that is not supported by pre-generated makefiles that are shipped with the SDK right now you can simply use CMake to generate the necessary files. If you have never done that before the easiest way to start is probably the cmake-gui tool. Simply download at least version 3.8 of CMake, install it and start the cmake-gui tool.
After starting the tool you will see something like this:
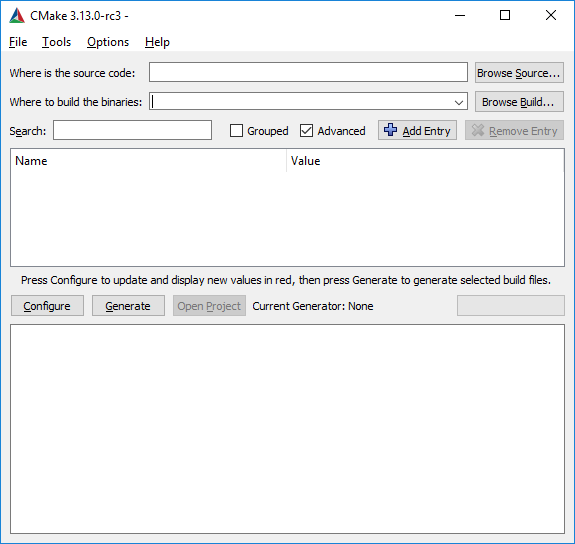
- Click the 'Browse Source...' button and navigate into the "$(MVIMPACT_ACQUIRE_DIR)/apps" folder of the Impact Acquire installation
- Click the 'Browse Build...' button an select a folder where you want the project files to be generated. The folder you select here will also contain the binaries you will build later. Typically this folder is outside the installation or source directory. Most of the time the installation folder will be read-only for standard users anyway
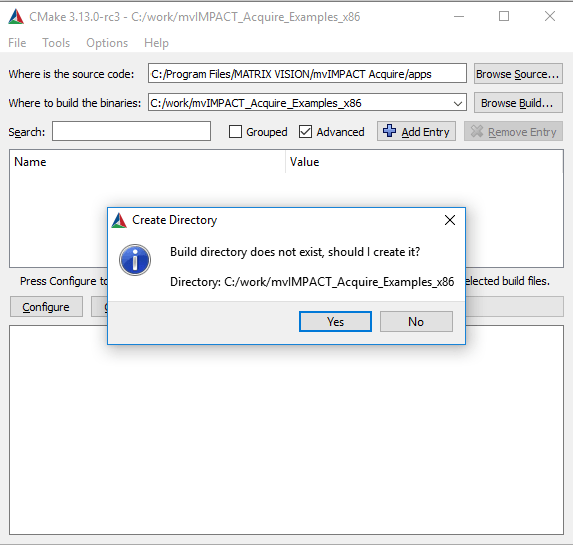
- Now click the 'Configure' button
- CMake will ask you if the target folder shall be created if it does not already exist. Select 'Yes'!
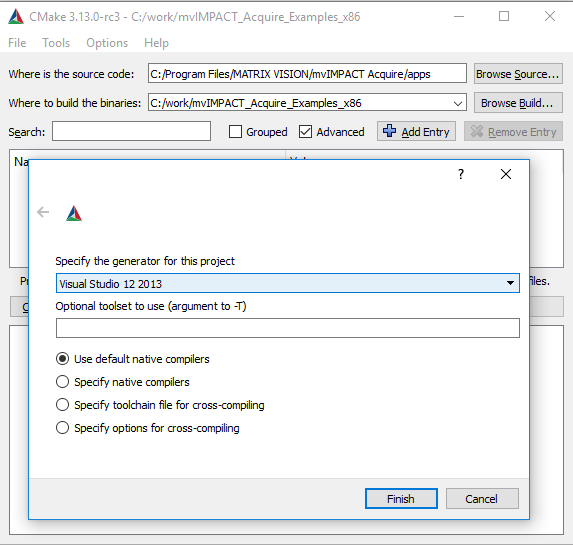
and select the compiler/IDE you want to generate files for (select 'Borland Makefiles' if you want to compile using a Borland compiler (e.g. when using RAD Studio or any Embarcadero C++ compiler package) OR follow the CMake instruction with Ninja support from the Embarcadero website: https://community.idera.com/developer-tools/b/blog/posts/using-cmake-with-the-free-embarcadero-c-compiler, http://docwiki.embarcadero.com/RADStudio/Rio/en/Using_CMake_with_C%2B%2B_Builder)
Afterwards CMake will create the target folder and will perform various checks and basic configuration work:
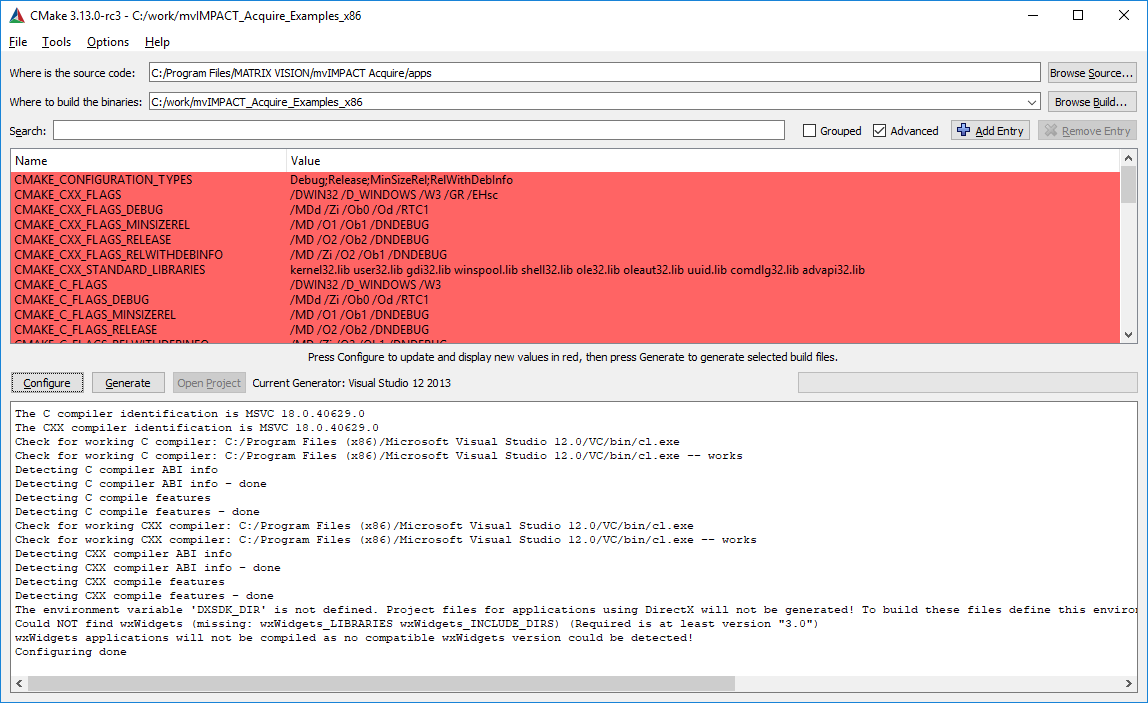
Once this completed successfully you will notice a lot red properties in the upper half of the tool. These are CMake variables that have either directly or indirectly been created during the last step. Within the CMake GUI everything that is either new or has changed since the last configuration or generation run is displayed in red as there are usually so many parameters in complex projects it would be hard to see the differences otherwise. You can use the tool to modify individual properties once you know what you are doing. So right now there is nothing to worry about. Now click the 'Generate' button.

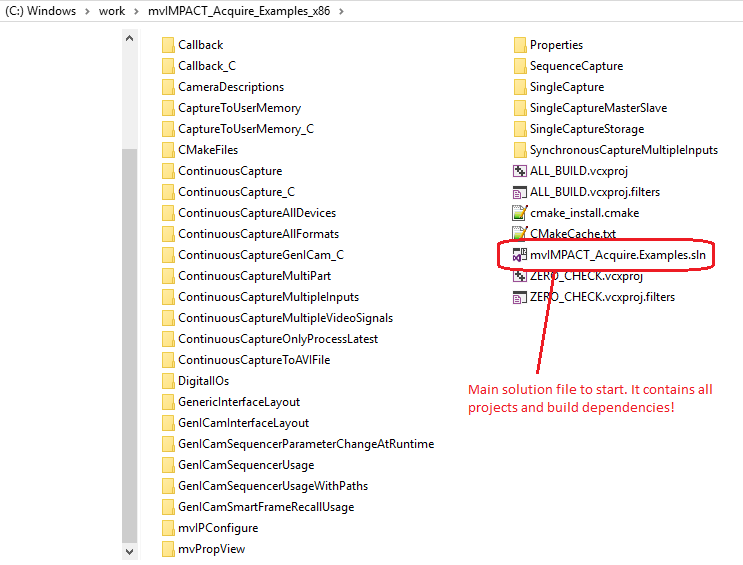
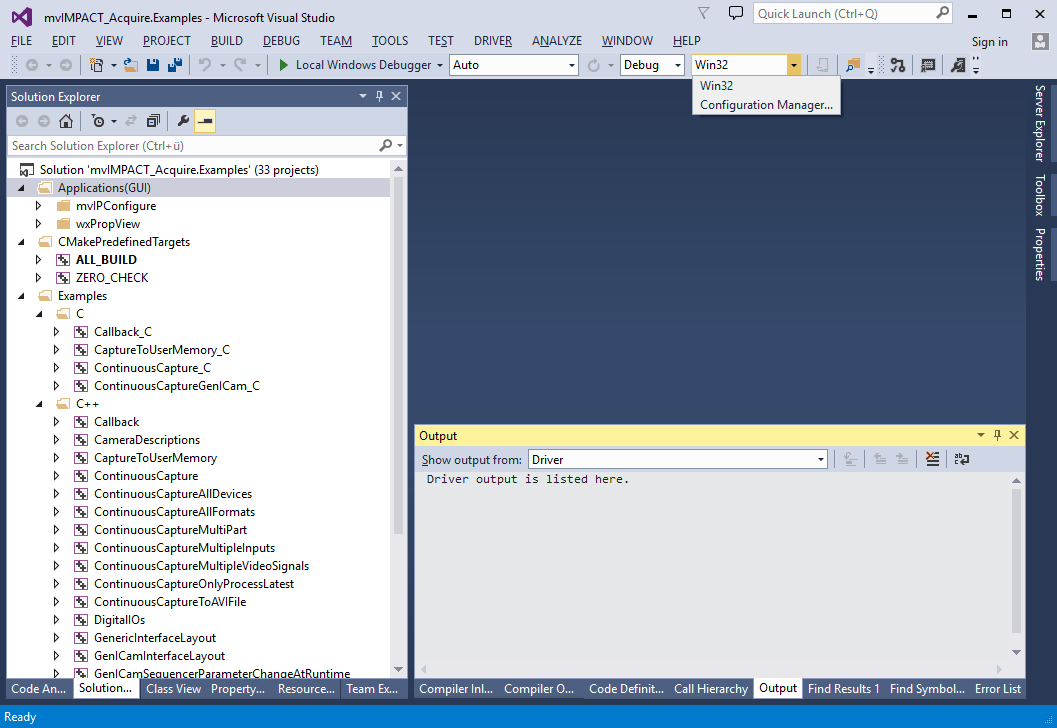
Everything went alright if no error messages are displayed in the lower output window of the application. The last message you should see there is Generating done. Now you can end the application and open the folder you did previously select for generating the files into. You will find all the project- or makefiles and a solution file (when working with Visual Studio on Windows®) here. If you are working on Windows® and have generated files for Visual Studio just open the solution and you can build the examples and tools. On Linux Systems or if you have generated makefiles(e.g. for Borland) you can simply call make all instead.
- Note
- For some generators you might need to open an appropriate shell in order to call
makesuccessfully (e.g. a RAD Studio command shell)
You might wonder why you cannot switch between 32-bit and 64-bit within that solution. CMake will always create projects for either 32- OR 64-bit. You can create a 2nd target folder and during the configuration process select a different generator/toolset for 64-bit output.
- Note
- One important thing to keep in mind: When working with CMake it is almost NEVER necessary to directly edit the project- or makefiles or make changes to the solution file. Change the corresponding CMake source files instead and rebuild the solution (or just the
ZERO_CHECKproject if you are working with Visual Studio on Windows®). Whenever CMake detects a change in it's source files it will automatically recreate the makefiles and apply changes to e.g. a Visual Studio solution. This takes some time to get used to but is much easier than manually adjusting VIsual Studio build dependencies or project properties! Especially as most changes usually apply toDebugANDReleasebuilds etc.. However also keep in mind that this doesn't apply to ALL properties of a project only those which are actually stored in the project file. The debugging properties (startup application, parameters debug connection for example are NOT part of the project thus can be configured as you are used to do it. This also makes perfect sense when thinking about it!
Some of the example applications and tools have certain requirements. If these are not met during the generation process CMake will output some messages why a certain target will not be available. For this target then there will also be no project file. Applications/tools with special requirements are:
- ContinuousCaptureDirectX: This example needs a version of the DirectX SDK as it tries to link to some of the DirectX libraries. To build it define and environment variable DXSDK_DIR pointing to the top-level folder of the platform SDK or DirectX SDK containing the libraries before generating the project files. If you have already generated the project files simply delete the generated folder and re-run the CMake process.
- DeviceConfigure, IPConfigure, ImpactControlCenter: These applications have been developed using wxWidgets thus wxWidgets needs to be found on the system you are trying to build them. You can simply install a wxWidgets version (3.x or greater) on the system before generating the project files OR you can define environment variables WX_WIDGETS_SOURCE_DIR, WX_WIDGETS_BUILD_DIR_X86 and WX_WIDGETS_BUILD_DIR_X64 to use a certain version of wxWidgets for the generation process. If you have already generated the project files simply delete the generated folder and re-run the CMake process.
GNU Makefiles
The GNU Makefiles CMake generates are quite sophisticated! For example the will allow to build each target individually and when doing that all the dependencies will automatically be resolved. So you can simply call
and myTarget as well as all it's dependencies will be built automatically.
Calling
will output all the linker and compiler parameters for each file in each target.
And of course calling
will result in fast parallel builds on a machine with 8 cores. Always specify a value one higher than the actual number of cores on your build system.
CMake support? Cool! Tell me all about it!
Well if you are already familiar with CMake there is not too much to be said. You can simply integrate Impact Acquire into your build tree then. Impact Acquire comes with a CMake configuration file mvIMPACT_AcquireConfig.cmake located in the top-level folder of the installation. Simply include it into your build tree:
Afterwards you can use Impact Acquire imported targets and include directories. There are just a couple of variables you will need:
mvIMPACT_Acquire_INCLUDE_DIRSfor all yourtarget_include_directoriesstatementsmvIMPACT_Acquire_LIBRARIESfor all yourtarget_link_librariesstatements- you can also add
mvIMPACT_Acquire::mvDeviceManagerandmvIMPACT_Acquire::mvDisplay(Windows® only) to yourtarget_link_librariesstatements instead if you want more control over the link requirements (e.g. if you do not want to use the mvDisplay library at all you also might not want to ship it thus consequently you will not link it)
- you can also add
So a very simple application using Impact Acquire might look like this inside the CMakeLists.txt file:
folder structure:
 root
  |
  |- myTarget
  |     |- CMakeLists.txt
  |     |- myCode.c
  |     |
  |    etc.
  |- CMakeLists.txt
  |
 etc.
the top-level CMakeLists then might contain something like this:
the CMakeLists.txt in the folder myTarget might contain the following code:
You may wonder why this example does not specify any include directories. Well you can do that if you like:
However this statement actually is redundant as the libraries of mvIMPACT_Acquire_LIBRARIES already add these directories to their public link interface. You can therefore either add it if you like or skip it.
On Windows® Impact Acquire uses the auto-link feature if not told otherwise. Please refer to Windows® to understand what impact that might have on your application and how to configure it to suit your needs.
C++
For C++ applications not using the GenICam™ interface only the header mvIMPACT_acquire.h is needed. Applications also using the GenICam™ interface might need some addition header files:
- mvIMPACT_acquire_GenICam.h
- mvIMPACT_acquire_GenICam_CustomCommands.h
- mvIMPACT_acquire_GenICam_FileStream.h
If you want to use certain helper classes like e.g. mvIMPACT::acquire::helper::RequestProvider you will need to include
- mvIMPACT_acquire_helper.h
as well.
- Note
- This header makes heavy use of advanced C++11 and above features. Make sure you are using an up to date compiler for this! Make sure to include $(MVIMPACT_ACQUIRE_DIR)/CMake/cpp.standard.detection.cmake in your CMake build system then or define a CMake variable CPP_STANDARD_VERSION with the version/value of the C++ standard your compiler does understand (e.g. 11, 14, 17, ...) to tell this and other header files of Impact Acquire which features to use and which not!
Every header file shall be included like this:
Applications also using the display module used by various example applications another header file will be needed:
- mvIMPACT_acquire_display.h
Include this file like this:
So always relative to the root directory of the full package. Then and only then
will work properly!
Building The Examples And GUI Tools Using CMake
The source code shipped with Impact Acquire comes with CMake support files. When you want to build or modify the example code using a compiler that is not supported by pre-generated makefiles that are shipped with the SDK right now you can simply use CMake to generate the necessary files. You will find the top-level CMakeLists.txt file inside the apps folder of the Impact Acquire installation.
Using CMake To Generate Makefiles For Embarcadero C++ Builder With Ninja Support
Everything stated in this section is more or less copied from the corresponding Embarcadero documentation (http://docwiki.embarcadero.com/RADStudio/Rio/en/Using_CMake_with_C%2B%2B_Builder) and it is recommended to obtain up to date information from there. This is just meant to list the main steps needed in case the website is not available.
CMake Command-Line Support
RAD Studio 10.2 Tokyo Release 3 includes support for building CMake projects on the command line using RAD Studio's C++ Compilers. You can compile for Windows® or for other platforms from Windows®. CMake supports RAD Studio's Clang-enhanced compilers: BCCAARM for Android, BCCIOSARM64 for 64-bit iOS, BCCIOSARM for 32-bit iOS, BCC64 for 64-bit Windows®, and BCC32X for 32-bit Windows®. RAD Studio 10.2 Tokyo Release 3 also supports using Ninja with CMake. This allows for fast parallel compilation.
Installing CMake And Ninja
CMake
Download and install CMake 3.10 or higher. Use the binary installer, since it can optionally add CMake to the system path. Make sure you select that option during the installation.
CMake files are located in C:\Program Files (x86)\Embarcadero\Studio\19.0\cmake (your version might differ from 19.0 of course). However, to prevent errors in the build process, you need to move one file manually. Follow the steps below to do this:
- Locate your CMake installation folder and the Modules\Platform sub-folder. E.g. C:\Program Files\CMake\share\cmake-3.10\Modules\Platform
- Locate the
Windows-Embarcadero.cmakefile and make a backup. - Copy
Windows-Embarcadero.cmakefrom the Studio\19.0\cmake folder and overwrite the version in the CMake folder.
Embarcadero claims to have greatly extended the inbuilt CMake support for the Windows® compilers and you need to use this file to build successfully.
Ninja
Download and install Ninja 1.8.2 or above. You'll need to add it to the system path manually.
How To Use CMake
Start a RAD Studio command prompt from the Start menu, or by opening a command prompt and executing rsvars.bat in the RAD Studio bin folder.
- To target Win32: cmake -DCMAKE_C_COMPILER=bcc32x.exe -DCMAKE_CXX_COMPILER=bcc32x.exe -G Ninja <directory>
- To target Win64: cmake -DCMAKE_C_COMPILER=bcc64.exe -DCMAKE_CXX_COMPILER=bcc64.exe -G Ninja <directory>
As and example how this could look like in a Windows® batch file please refer to the following piece of code:
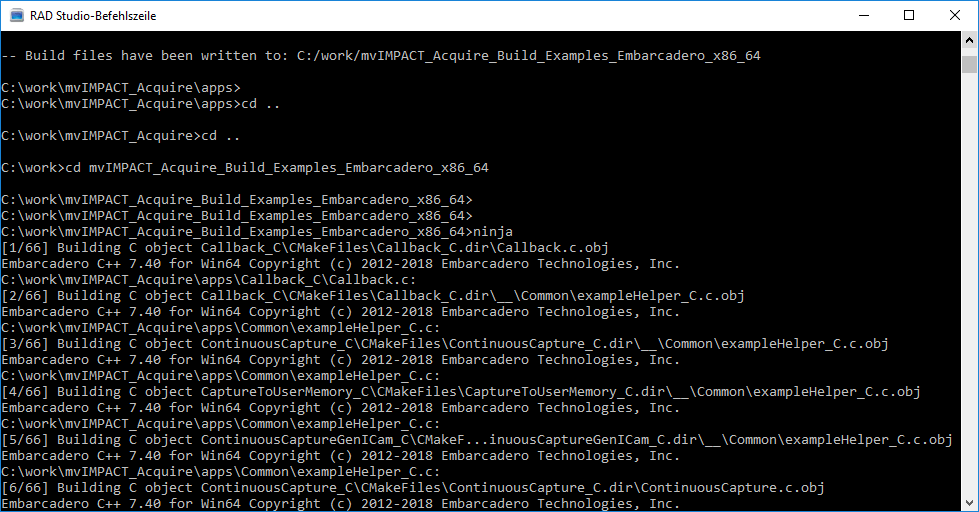
Then move into one of the generated folders and call ninja to invoke Ninja to do the actual build.
You should see something like this in your output window:
Using CMake To Generate Borland Makefiles
Apart from the Ninja based approach explained above the Borland/Embarcadero/RAD Studio compiler can also be used without modifying CMake as described above. In fact when modifying the CMake Embarcadero support file (Windows-Embarcadero.cmake) the approach explained here does no longer seem to work and building the example applications might fail with an error message
Generating Borland Makefiles is pretty straight forward and either be done using the CMake GUI or via the command line. A possible command line could look like this:
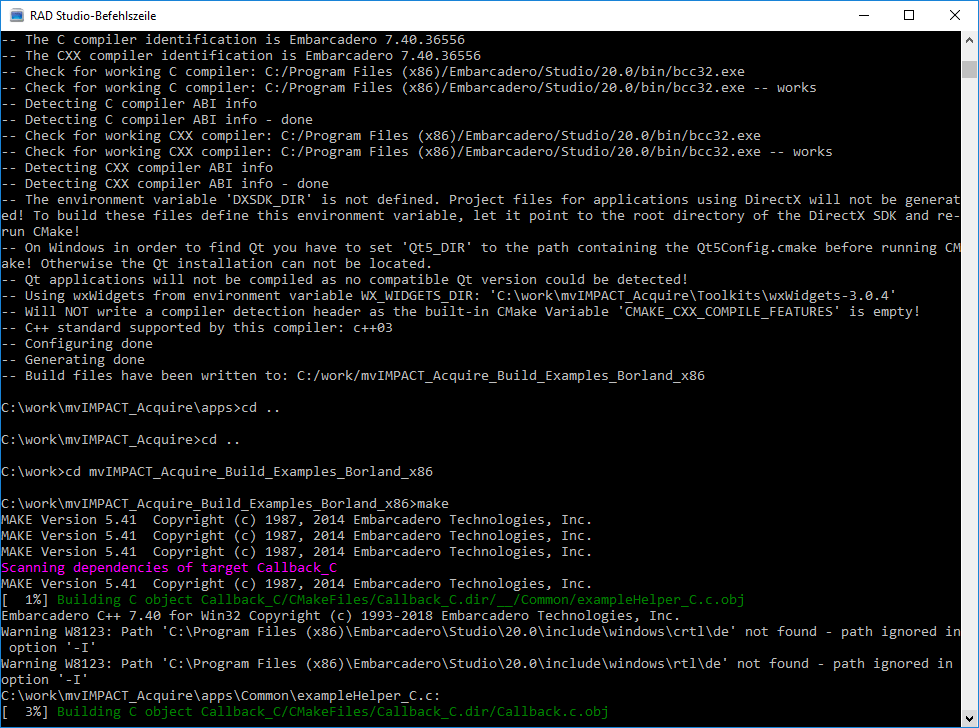
Then start a RAD Studio command prompt from the Start menu, or by opening a command prompt and executing rsvars.bat in the RAD Studio bin folder, move into the generated folder and call make to do the actual build.
You should see something like this in your output window: