Building
If for whatever reason you cannot or don't want to use CMake please think again! It is much easier! If the answer is still no follow the guidelines presented in this section!
Always specify ONE include path only! It should point to the top-level folder of the SDK installation. All include statements inside the SDK headers will assume this and will therefore include additional header files belonging to this SDK relative to this top-level directory. Typically therefore this include path will be "$(MVIMPACT_ACQUIRE_DIR)". Assume your installation looks like this:
Then the one and only include path you should specify would be the path to "<myInstallationPath>". All files belonging to the interface are written in a way that they rely on this path and that no other path is needed.
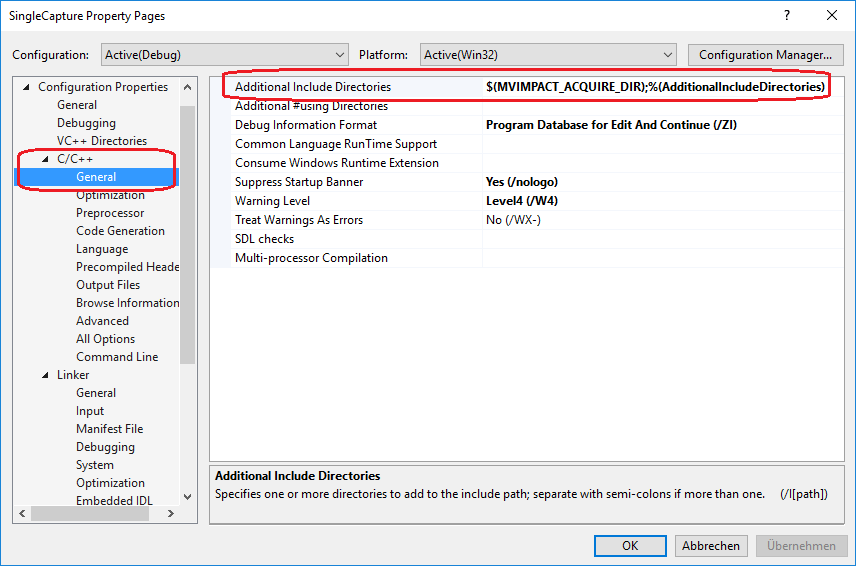
For example using a Impact Acquire example application like SingleCapture in Microsoft Visual Studio in the standard installation environment, the include path should also be "$(MVIMPACT_ACQUIRE_DIR)" for the reasons mentioned above:
For example the main C++ header file mvIMPACT_acquire.h will include the C headers like this:
C
When building a plain C application the only header that needs to be included is mvDeviceManager.h. This header must be included in every file that uses functions belonging to the Impact Acquire 'C' interface.
Include the header into your project like this:
This will work when the include path for the project has been set up as described above.
C++
For C++ applications usually the only header needed will be mvIMPACT_acquire.h and it shall be included like this:
This will work when the include path for the project has been set up as described above. The C++ interface is provided completely in source in a single inline wrapper file building a thin layer on top of the C interface. It (for C++ developers) is much easier to use then the conventional C layer.
Apart from that there are some other header files that provide additional features and functions when e.g. using GenICam™ compliant devices and drivers, functions to display images or features needed for very special applications. A full list of files belonging to this SDK can be found in the files section of this documentation.
Common
When installing the SDK on Windows® via one of the MSI packages provided, an environment variable called MVIMPACT_ACQUIRE_DIR will be registered during the installation, on Linux this variable will also be generated during the installation. It points to the route path of the installation as discussed above.
Makefiles or project files then can specify the common include path by referencing the environment variable. When working with Visual Studio on Windows® e.g. by opening the settings for the current project, clicking on the "C++" tab and then "additional include directories" and adding "$(MVIMPACT_ACQUIRE_DIR)" to the list of additional directories.
The advantage of this is that this project will compile even if it is copied to a different location.
Linking
No matter whether building C or C++ applications there is only one library that needs to be linked with the application: mvDeviceManager. No driver specific library must be linked directly as these will be dynamically loaded by the mvDeviceManager shared library internally.
Windows®
When working with Microsoft Visual Studio or any other compiler that supports automatic linking, no library must be specified explicitly for linking, as a "#pragma" will perform this work for you.
- Note
- The Impact Acquire SDK is shipped with import libraries that are compatible with Microsoft Visual Studio as well as import libraries that can be used with Borland/Embarcadero like compilers. All these import libraries will be installed into the platform specific lib folders when installing a driver package with the SDK related modules. The Microsoft Visual Studio compatible import libraries use the name of the DLL they are meant for but instead of the .dll extension they use .lib. The import libraries for Embarcadero add a "b" to the original DLL name. So for the mvDeviceManager library the following files will be installed: <myInstallationPath>|- lib| |- mvDeviceManager.lib // 32-bit Microsoft Visual Studio import library| |- mvDeviceManagerb.lib // 32-bit Embarcadero import library (created with the corresponding 'implib'-tool)| |- x64| |- mvDeviceManager.lib // 64-bit Microsoft Visual Studio import library| |- mvDeviceManagerb.lib // 64-bit Embarcadero import library (created with the corresponding 'mkexp'-tool)(Yes! The default file name would be 'mvDeviceManager.a' but for compatibility reasons it is 'mvDeviceManagerb.lib' as well!)|- etc.
Direct linking of an export library however sometimes is not desired as this will result in an executable or a library, that can't be started/loaded when the linked library is not present on the target platform. Therefore sometimes dynamic loading is preferable.
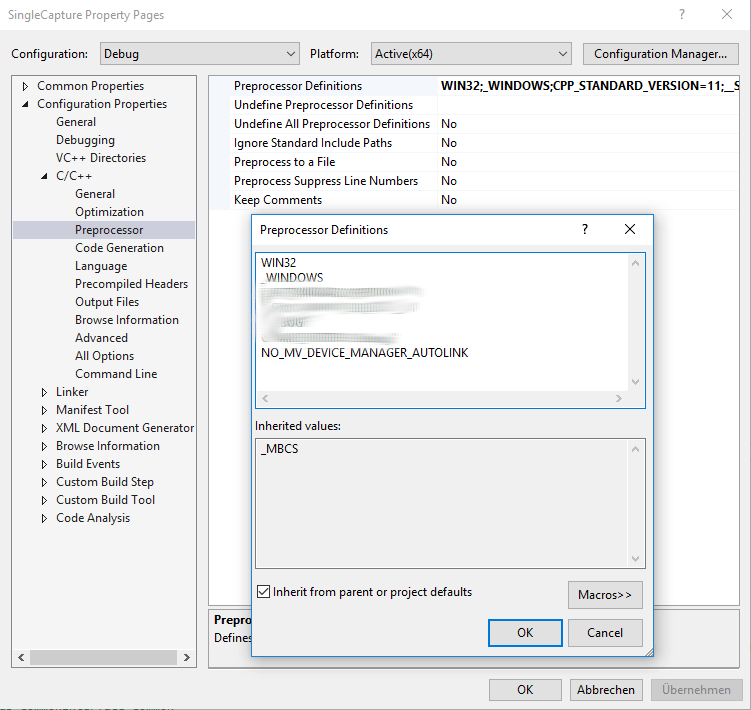
To disable automatic linking your project- or makefile must define a macro NO_MV_DEVICE_MANAGER_AUTOLINK. Then however every function exported by the mvDeviceManager library and referenced in the application must be extracted from the library at runtime using the appropriate functions offered by the operating system (e.g. GetProcAddress or dlsym). The macro can either be defined directly in front of the include statement that would include the Impact Acquire API or inside the IDE project. Within Visual Studio this could be achieved like this:
- Note
- When working with the C++ interface, this internally calls functions that might need to be resolved then as well. The reported linker errors for unresolved symbols will provide a good starting point when looking for a list of functions that need to be imported.
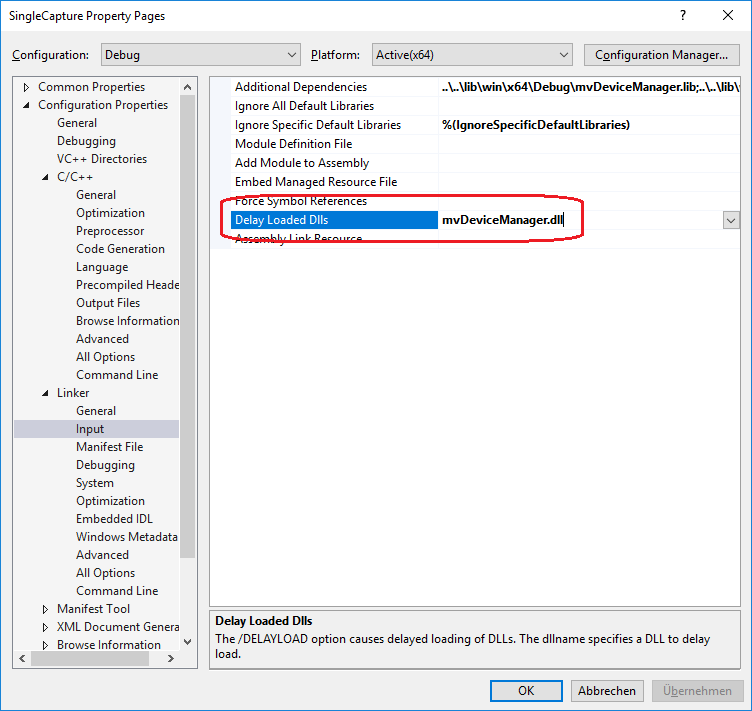
Another interesting approach might be the delay-load feature introduced with Microsoft Visual Studio 2003. Here even if the linked library (mvDeviceManager.dll in this case) is not present on the target platform the application will still be executable even when linked with the import library. However in order not to crash the application once the first function exported by the missing library is called some extra precaution will be necessary. Either you can try if
succeeds before accessing functions and objects belonging to the Impact Acquire interface or you have to handle the exceptions generated by the delay load framework correctly, which is a bit more difficult and doesn't provide additional benefits.
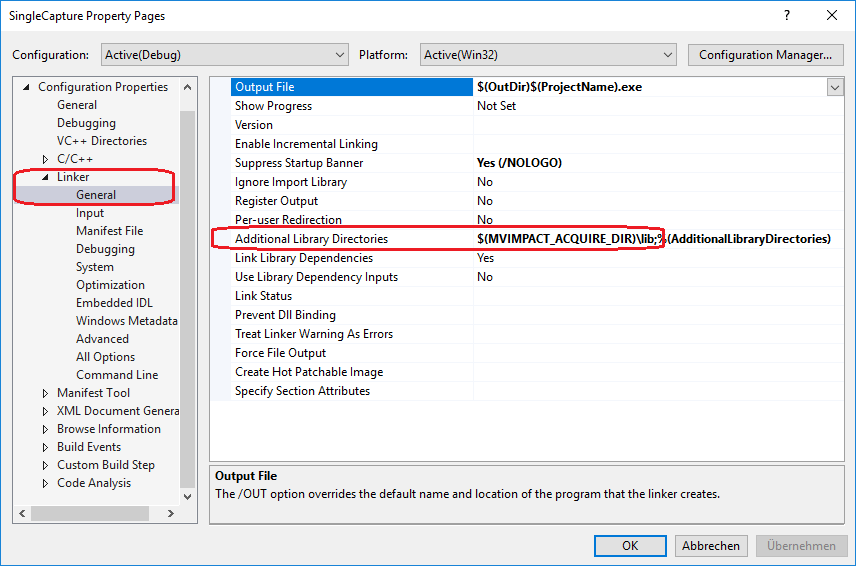
Specifying the link path
If you want to specify the link path manually, you should refer to folder of the Impact Acquire installation. Using a Impact Acquire example application like SingleCapture, the link path to the libraries will use the environment variable "$(MVIMPACT_ACQUIRE_DIR)". Because of that it doesn't matter where the example project is located. The libraries and header files will be found in any case: