Receive/Transmit Buffers
A sufficient amount of kernel socket buffers for receiving and transmitting network packets is crucial for a flawless operation!
The following table explains the important settings and recommended values.
| Setting | Value | Description |
| kern.ipc.maxsockbuf | 8388608 | Maximum combined socket buffer size in bytes |
| net.inet.udp.maxdgram | 9216 | Maximum size of a UDP packet in bytes |
| net.inet.raw.recvspace | 16777216 | Size of the socket receiving buffers for UDP transport in bytes |
| net.inet.udp.recvspace | 7454720 | Size of the socket receiving buffers for RAW transport in bytes |
Maximum Transmission Unit (MTU) / Jumbo Frames
- By running ifconfig you can check the current MTU of the network interface.
-
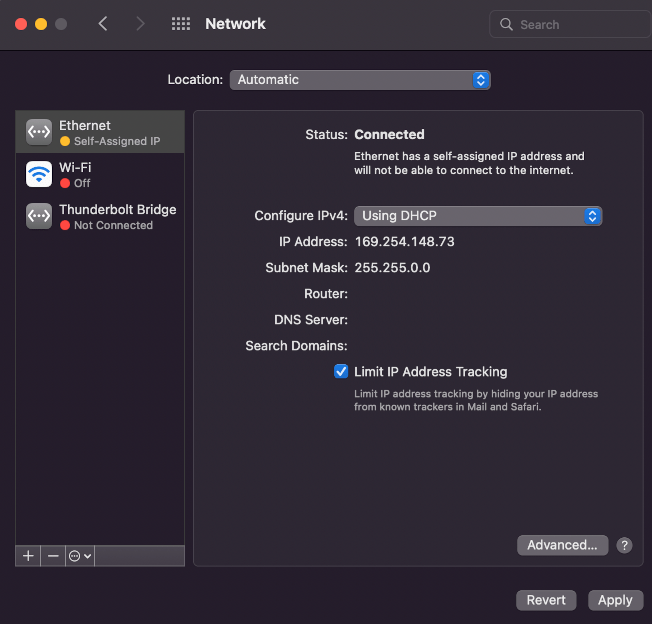
Usually it is best to increase the MTU to the highest value supported by all network components which are within the transmission chain for a better performance. You can set this value permanently in the System Preferences' Network configuration GUI for "Ethernet" (see the image below).
Ethernet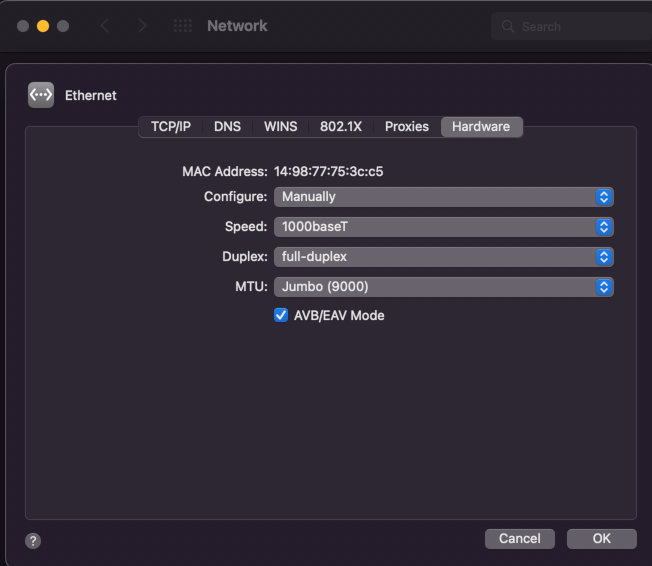
- Reboot the system. Afterwards, you can verify the configured MTU by running ifconfig again.
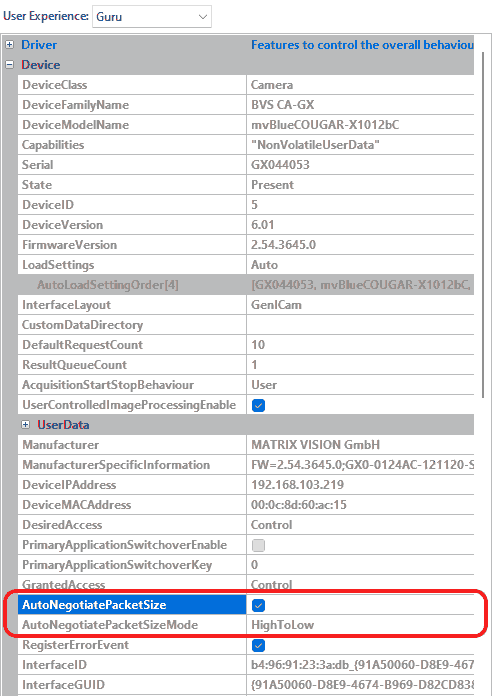
The camera sets the MTU to the maximum value automatically given by the NIC or switch and supports a maximum MTU of 8K. You can manually change the network packet size the camera uses for transmitting data using this property: "Setting → Base → Camera → GenICam → Transport Layer Control → Gev Stream Channel Selector → Gev SCPS Packet Size":
- Note
- Since the BVS CA-GT family supports 16k packets for using these devices NICs and switches supporting 16k packets as well are recommended.
As a general rule of thumb it can be said that the higher the MTU, the better the overall performance, as fewer network packets are needed to transmit a full image, which results in less overhead that arises from the handling of each arriving network packet in the device driver etc. However every component involved in the data transmission (that includes every switch, router and other network component installed in-between the device and the system receiving the packets) must support the MTU or packet size, as otherwise the first component not supporting the packet size will silently discard all packets larger than the component can handle. Thus the weakest link here determines to overall performance of the full system!
- Note
- There is no need to set the transfer packet size manually. By default Impact Acquire will determine the maximum possible packet size for the current network settings automatically when the device is initialised. However again the weakest link determines this packet size thus NICs should be chosen and configured appropriately and the same goes for switches!
The behavior of the auto negotiation algorithm can be configured manually or to disable it completely if needed. The AutoNegotiatePacketSize property determines if Impact Acquire should try to find optimal settings at all and the way this is done can be influenced by the value of the AutoNegotiatePacketSizeMode property. The following modes are available:
| Value | Description |
| HighToLow | The MTU is automatically negotiated starting from the NICs current MTU down to a value supported |
| LowToHigh | The negotiation starts with a small value and then tries larger values with each iteration until the optimal value has been found |
To disable the MTU auto negotiation just set the AutoNegotiatePacketSize property to "No".
- Note
- All components belonging to the network path (device, network interface card, switches, ...) will affect the MTU negotiation as every device will support the negotiated value.
- Note
- Manually setting the packet size should usually only be done if
- auto-negotiation for some reasons doesn't work properly
- there are very good (e.g. application-specific) reasons for doing so
IPv4 addressing
"DHCP"
Connecting the camera via DHCP (e.g. when connecting the camera through a network switch): set the IPv4 addressing method of the host's network controller as DHCP in the IPv4 configuration. Reboot the system afterwards.