Loading...
Searching...
No Matches
Setting a flicker-free auto expose and auto gain
Introduction
In order to prevent oscillations it is important to adapt the camera frequency to the frequency of AC light.
This is, for example, in
- Europe 50 cycles (100 fluctuations/s) whereas in
- USA, Japan and other countries it is 60 Hz.
This means the camera must strictly be coupled to this frequency. In conjunction with auto exposure this can only be maintained by using a timer based generation of external trigger pulses. This is a behavior of both sensor types: CCD and CMOS.
- Note
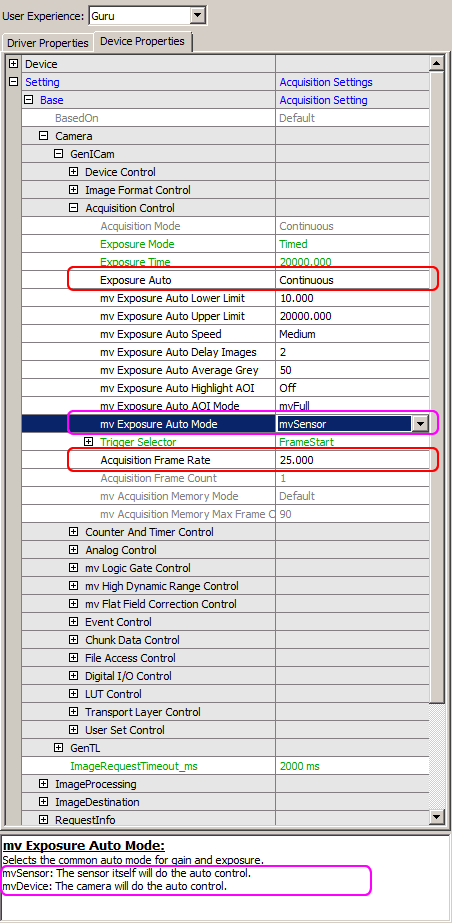
- It is not enough to use "Setting → Base → Camera → GenICam → Acquisition Control → Acquisition Frame Rate" for this, as there are small fluctuations in this frame rate if the exposure time changes. These fluctuations lead to oscillations (see settings marked with red boxes in Figure 1). The "Acquisition Frame Rate" will only provide the exact frame rate if auto exposure is turned off.
As shown in Figure 1, it is possible to set ("mv Exposure Auto Mode") which part of the camera handles the auto expose (device or the sensor itself; pink boxes). Using "mvSensor" as "mv Exposure Auto Mode", it is possible to avoid oscillations in some cases. The reason for this behavior is that you can set more parameters like "mv Exposure Auto Delay Images" in contrast to "mvDevice". However, as mentioned above it is recommended to use a timer based trigger when using auto expose together with continuous acquisition.
Using ImpactControlCenter
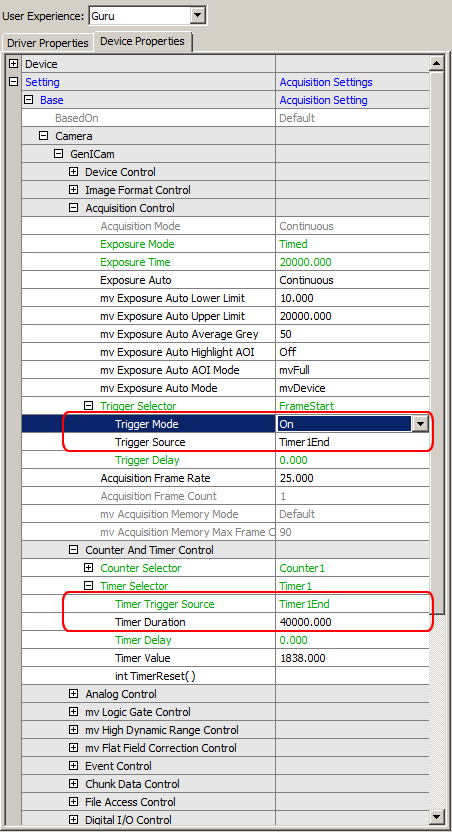
Figure 2 shows how to generate a 25 Hz signal, which triggers the camera:
- "Setting → Base → Camera → GenICam → Counter & Timer Control → Timer Selector → Timer 1":
- "Timer Trigger Source" = "Timer1End"
- "Timer Duration" = "40000"
             1
FPS_max =  -----     = 25
           40000 us
- "Setting → Base → Camera → GenICam → Acquisition Control → Trigger Selector → FrameStart":
- "Trigger Mode" = "On"
- "Trigger Source" = "Timer1End"
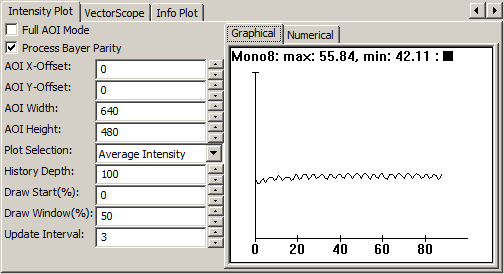
No oscillation occurs, regardless of DC ambient vs. AC indoor light.
This operation mode is known as flicker-free or flicker-less operation.
What it mainly does is to adjust the frame frequency to precisely the frequency of the power line. Usually the line frequency is very stable and therefore is the harmonic frequency difference of the two signals are very slow; probably in the range of < 0.1 Hz.
The fact that we do not know the phase relation between the two frequencies means that we scan the alternating ambient light source with our camera. The shorter the exposure time, the more we see a slow change in brightness.
Using AutoExposure/AutoGain can completely eliminate this change because the frequency of change is very low. That means it will be legal if we calculate a brightness difference in one picture and apply it for the next one, because the change is also valid in the next one; as we fulfill the Nyquist theorem.
If we use an arbitrary scanning frequency like 20 fps or whatever your algorithm and data flow is accepting, is wrong in this aspect and leads to oscillations and undesired flicker.
Pointing to a 60 Hz display with flashing backlight an oscillation of 10 Hz can be seen of course.
Conclusion
To avoid oscillations, it is necessary to adapt the camera frequency to the frequency of AC light. When using auto expose a flicker-free mode (timer based external trigger) is needed. If the camera is used throughout the world it is necessary that the frequency of AC light can be set in the software and the software adapts the camera to this specific environment.