- Since
- Version 2.11.3 of this application
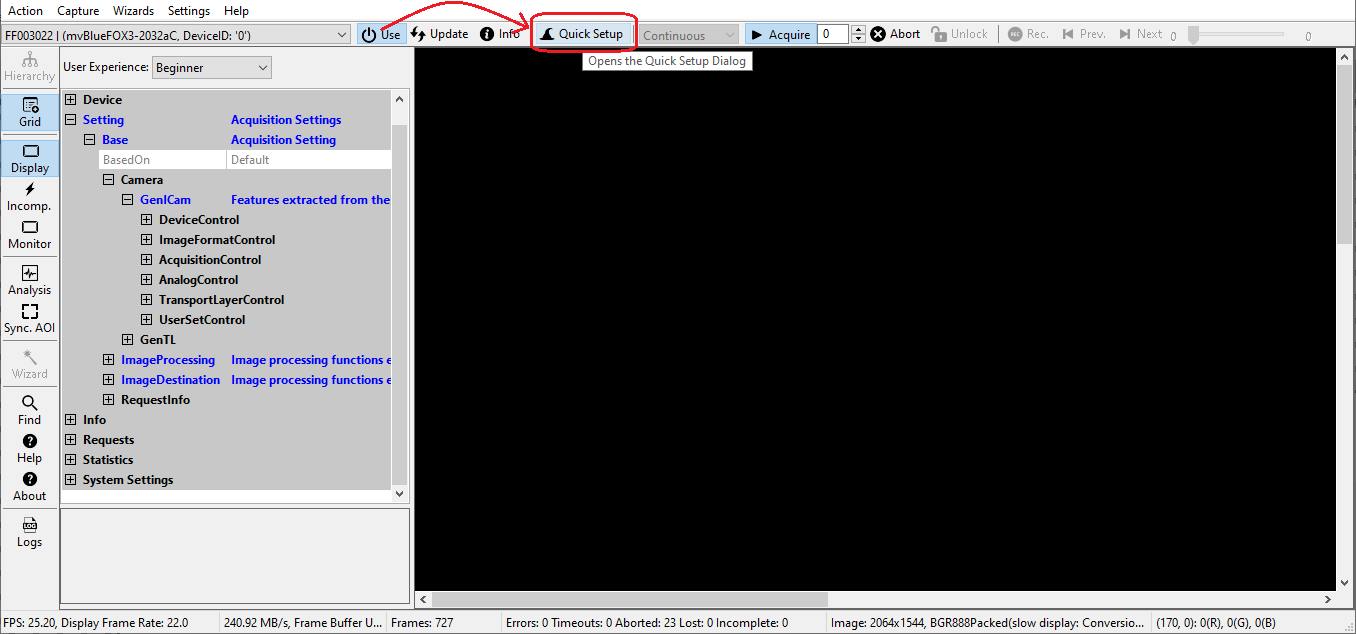
The Quick Setup Wizard is a tiny and powerful single window configuration tool to optimize the image quality automatically and to set the most important parameters which affect the image quality, in an easy way and to get an immediate preview of these changes. If the wizard does not start automatically anymore because during a previous session this option has been enabled the wizard needs to be started manually:

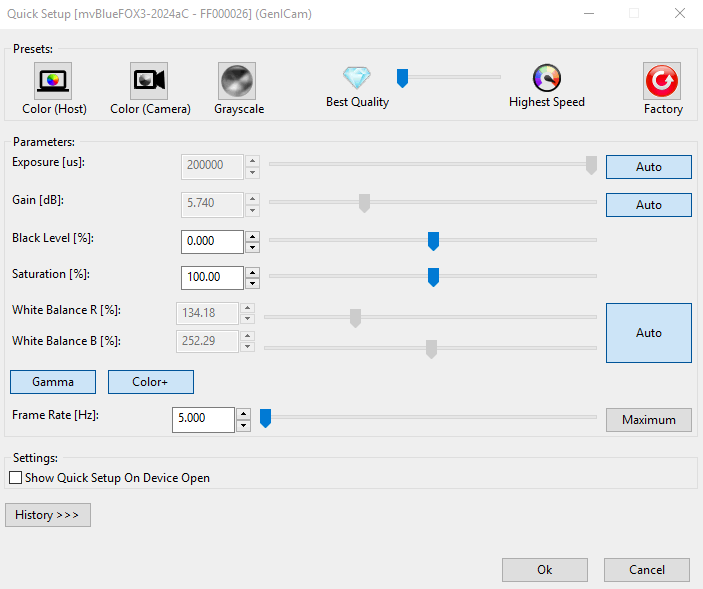
Afterwards the following dialog will be displayed:

Settings will be accepted by clicking "Ok", otherwise the changes are discarded and the previous ones will be restored when leaving the dialog.
Depending on the sensor (gray-scale or color/Bayer), the wizard will automatically pre-select settings resulting in an optimal image quality.
"For all cameras:"
The pixel format is chosen as 10 bit (if possible) as a good compromise on image quality and speed.
It will further set
- "Exposure" to Auto,
- "Gain" to Auto,
- "Frame rate" to Auto based on current settings of the camera, and
- switches camera into continuous mode
"In case of gray:"
The above settings will be also applied whenever the "Gray Preset" button is pressed. For gray cameras it is assumed that image processing prefers a linear camera response.
"In case of color:"
- "Auto White Balance" in the device will be switched on
- a moderate, host based "Gamma correction" (1.8) will be applied
- a sensor specific "Color Correction Matrix" and the respective "sRGB display matrix" will be applied (if possible this will be done in the device to reduce the CPU load on the host.
These settings will also be applied whenever the "Color Preset" button is pressed. Assuming that for a color camera image this results in the best human visual feedback.
Changing Presets
The following presets are available:
- Gray
- Color (Host) will perform most of the expensive optimizations by utilizing the host systems CPU
- Color (Camera) will perform most of the expensive optimizations by utilizing the device, might not always be available depending on the device's capabilities
- Factory
"Factory" can be used as a fall back to quickly skip or remove all presets and load the factory default settings.
Modifying Settings
All auto modes can be switched off and all settings, such as Gain, Exposure etc. can then be adjusted manually by using:
- the sliders
- the spin buttons
- entering values into the text controls
Toggling the "Gamma" button loads or unloads a host based 10-bit Gamma correction with a moderate value of 1.8 into the signal processing path. Switch "Gamma" to make a gray-scale image appear natural for the human eye.
Toggling "Color+" button switches on/off both CCM and sRGB display matrix. This optimizes a color sensor's response for the human eye and goes in conjunction with a display color response. Because sRGB displays are mostly used and this is the default color space in Windows® OS, these are preselected. If another display matrix (e.g. Adobe or WideGamut) is required this can be selected by changing the ColorTwistOutputCorrection property in The Property Grid accordingly. To locate the feature the Find A Feature option could be used.
Setting The Black Level
The black level can be used if dark portions in the image are required to appear even darker or brighter.
- Note
- The slider combines analog and digital settings in a way that once the analog value range is fully use the digital range will be used addition. Analog is preferred whenever possible!
Setting The Gain
Allows to set the gain value manually.
- Note
- The slider combines analog and digital settings in a way that once the analog value range is fully use the digital range will be used addition. Analog is preferred whenever possible!
Setting The Saturation
Can be used to increase/decrease the color saturation to make the image appear more/less colorful. It does not change uncolored parts in the image nor changes the color tone or hue.
Disabling The Quick Setup Wizard
Uncheck the checkbox "Show Quick Setup On Device Open" to disable the Quick Setup Wizard to be called automatically:

Use the "Wizards" menu and select "Quick Setup" to open the Quick Setup Wizard again.
Applying/Discarding Changes
Use "OK" to use the values and settings of the Quick Setup Wizard and go back to the tree mode of ImpactControlCenter.
Use "Cancel" to discard the Quick Setup Wizard values and settings and go back to ImpactControlCenter and use the former (or default) settings.
Image Display Functions
The Quick Setup Wizard still allows zooming into the image by right-clicking on the image display and unchecking "Fit To Screen" mode. Use the mouse wheel to zoom in or out. Check "Fit To Screen" mode, if you want the complete camera image to be sized in the window screen size.
- See also
Known Restrictions
In cases of Tungsten (artificial) light, camera brightness may tend to oscillate if Auto functions are used. This can be minimized or avoided by setting the frame frequency to an integer divisor of the main frequency.
Example:
- Europe: 50 Hz; Set frame rate to 100, 50, 25 12.5 fps or appropriate.
- In countries with 60 Hz use 120, 60, 30 or 15 accordingly.
