|
Impact Acquire SDK C++
|
As any GenICam™ compliant device for which there is a GenICam™ GenTL compliant capture stack in Impact Acquire can be used using the Impact Acquire interface and it can't be known which features are supported by a device until a device has been initialised and its GenICam™ XML file has been processed it is not possible to provide a complete C++ wrapper for every device statically.
Therefore an interface code generator has been embedded into mvGenTLConsumer library. This code generator can be used to create a convenient C++ interface file that allows access to every feature offered by a device.
To access features needed to generate a C++ wrapper interface a device needs to be initialized. Code can only be generated for the interface layout selected when the device was opened. If interfaces shall be created for more than a single interface layout the steps that will explain the creation of the wrapper files must be repeated for each interface layout.
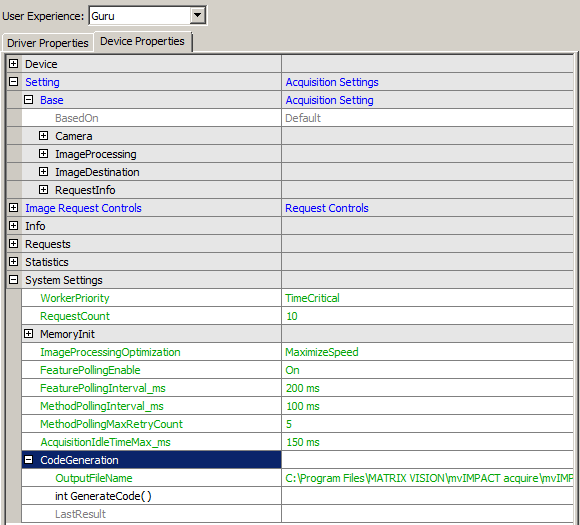
Once the device has been opened the code generator can be accessed by navigating to "System Settings → CodeGeneration".

To generate code first of all an appropriate file name should be chosen. In order to prevent file name clashes the following hints should be kept in mind when thinking about a file name:
If only a single device family is involved but 2 interface layouts will be used later a suitable file name for one of these files might be mvIMPACT_acquire_GenICam_Wrapper_DeviceSpecific.h.
For a more complex application involving different device families using the GenICam™ interface layout only something like this might make sense:
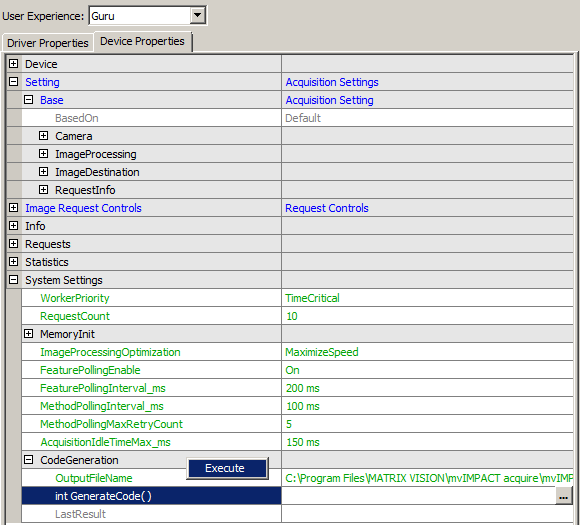
Once a file name has been selected the code generator can be invoked by executing the "int GenerateCode()" method:

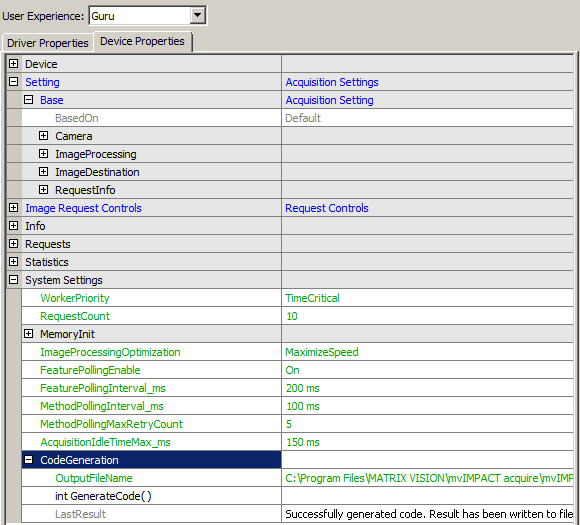
The result of the code generator run will be written into the LastResult property afterwards:

Each header file generated by the code generator will include "mvIMPACT_CPP/mvIMPACT_acquire.h" thus when an application is compiled with files that have been automatically generated these header files must have access to this file. This can easily achieved by appropriately settings up the build environment / Makefile.
To avoid problems of multiple includes the file will use an include guard build from the file name.
Within each header file, the generated data types will reside in a sub namespace of mvIMPACT::acquire in order to avoid name clashes when working with several different created files in the same application. The namespace will automatically be generated from the ModelName tag and the file version tags in the device's GenICam™ XML file and the interface layout. For a device with a ModelName tag mvBlueIntelligentDevice and a file version of 1.1.0 something like this will be created:
In the application the generated header files can be used like any Impact Acquire header file:
Now to access data types from the header files of course the namespaces must somehow be taken into account. When there is just a single interface that has been created automatically the easiest thing to do would probably an appropriate using statement:
If several files created from different devices shall be used and these devices define similar features in a slightly different way this however might result in name clashes and/or unexpected behaviour. In that case the namespaces should be specified explicitly when creating data type instances from the header file in the application:
When working with a using statement the same code can be written like this as well:
In some cases it is interesting to get notified about the occurrence of a certain event (e.g. a trigger signal or the end of an image being exposed) on the camera side as soon as possible. This can be achieved by using the events specified by the GenICam™ standard in combination with callbacks.
Depending on the firmware version the following events are currently supported:
The following example will illustrate how the events can be used to get notified about an image which has been exposed by the sensor, so the image has not been read out yet. This means the information about the finished image is available much earlier than the image itself. Depending on the resolution of the used device and the bandwidth of the used interface the saved time might be significant.
Any application that wants to get notified when a certain feature in the Impact Acquire property tree did change needs to derive a class from mvIMPACT::acquire::ComponentCallback and override the mvIMPACT::acquire::ComponentCallback::execute() method:
In order to be able to do something useful each callback can carry a pointer to arbitrary user data that can be used to get access to any part of the application code within the callback context. This example attaches an instance of the class EventControl to get access to the events properties, when creating the callback handler later.
The event control class needs to be instantiated to get access to switch on the devices GenICam™ events. In this case the "ExposureEndEvent" is enabled and will be sent by the device once the exposure of an image has finished.
Now the actual callback handler will be created and a property will be registered to it:
Once the callback is not needed anymore, it should be unregistered:
The code used for this use case can be found at: GenICamCallbackOnEvent.cpp
This section in meant to explain that it is also possible to access GigE Vision™ devices residing in a different subnet using the Impact Acquire framework.
More details about unicast device discovery can be found in the Impact Acquire GUI manual in the "Detecting Devices Residing In A Different Subnet" chapter belonging to the IPConfigure tool as well as in the GigE Vision™ device manuals under "Use Cases" where the "Discovering Devices In Different Subnets" is of particular interest.
When using the Impact Acquire API it is important to note that everything that will be configured using the API will get stored permanently for every user working on a particular system. This e.g. allows to configure everything up front using IPConfigure if the network setup is static. After this has been done each application using the Impact Acquire framework will detect the remote devices just as every other device. In order to clear or change this the API or IPConfigure has to be used again.
The properties needed for this configuration are
This section is meant to explain the basics of Actions and the details of Balluff extensions to them.
The GigE Vision™ standard defines a packet type "ACTION_CMD" specifically for the purpose of directly invoking functionalities in cameras as a kind of network-based event. With these packets, any party connected to the network may invoke certain predefined actions in a number of cameras, allowing for quasi-synchronous or scheduled activities. For details on configuring and arming actions, see the corresponding chapter in the GigE Vision™ specification. For configuring actions in the camera, some features are defined by the SFNC (Standard Features Naming Convention) in chapter "Action Control", which may be accessed by the following properties:
This way, a predefined number of GigE Vision™ devices may be set up to react to a number of action signals by configuring them as TriggerSource, CounterTriggerSource, CounterEventSource, CounterResetSource, or TimerTriggerSource.
The Interface module of the GenICam™ producer, on the other hand, contains standard-compliant functionality to emit action signals. You may set the ActionDeviceKey, ActionGroupKey and ActionGroupMask as a preparation before invoking the mvIMPACT::acquire::GenICam::ActionControl::actionCommand property itself, and you may set scheduling parameters to issue scheduled actions. The following properties are available:
In addition, you may set the GevActionDestinationIPAddress to unicast an action command to one camera only, or you may broadcast them if you select a broadcast address (like 169.254.255.255). See property:
If you need an acknowledge for the action that you signal, you may enable property mvActionAcknowledgeEnable. The necessary functionality depends on whether you use unicast (directing the aAction to just one camera), or if you broadcast the action command. In case of a unicast, you'll see the success of the command immediately in the return code of the command. In case of a broadcast, you have to specify the finalization condition for the command; first, you have to specify how many responses you expect (mvActionAcknowledgesExpected), and second, you have to define a maximum wait time (mvActionAcknowledgeTimeout), which is necessary to terminate the command if the requested number of responses has not yet arrived. In case of an error, there is a property for the number of received acknowledges (mvActionAcknowledgesReceived) as well as a property for the number of packets among them that signaled an error status (mvActionAcknowledgesFailed).
The related properties are:
Example 1: Suppose you have two cameras available in your application, both located at different spots beside a running lane. Both cameras shall take an image at a predefined time interval, but there is no possibility to synchronize the internal times with PTP, so scheduled Actions cannot be used. A small time difference in the interval is OK, and both cameras are controlled by a different PC, so actions shall be used. The time of exposure is determined at this PC, which will be broadcasting the action commands into the subnet with the two cameras. One camera will be triggered directly by setting the TriggerSource to its Action1 input, while on the other camera, the action signal triggers a 500ms timer, which in turn triggers the FrameStart of an image. Using action acknowledges, you can instantly receive confirmation for the success of the operation before even the first image is taken instead of having to wait for the end of exposure and the transfer of the image. In addition to the usual setup with the Keys and Mask properties and setting the gevActionDestinationIPAddress to the correct broadcast address, set mvActionAcknowledgeEnable to true, set mvActionAcknowledgesExpected to 2 and mvActionAcknowledgeTimeout to a suitable time (the default value is 20 ms). If the ActionCommand succeeds, you have the confirmation that the process has been successfully started and afterwards, mvActionAcknowledgesReceived holds the value of 2. Checking mvActionAcknowledgesFailed for a value of 0 asserts that both Acknowledge packets returned with a SUCCESS status.
Example 2: Suppose you have four cameras available in your application, and you'd like to use exactly two of them for a certain action command whose success you want an acknowledge for. Furthermore, you have a low-light environment resulting in long exposure times, and you need to know at once if the action command has been received, to be able to trigger the other two cameras with a different action command in case of an unsuccessful acknowledge. In addition to the usual setup with the Key and Mask properties and setting the gevActionDestinationIPAddress to a broadcast address, set mvActionAcknowledgeEnable to true, set mvActionAcknowledgesExpected to 2 and mvActionAcknowledgeTimeout to a suitable time (the default value is 20 ms). By setting up the standard action properties, you ensure that only the desired two cameras receive the first action command, and by enabling the acknowledge, you have a near-instant confirmation that the action command has arrived at the cameras and has triggered the desired activities (instead of, e.g. having to wait for the end of exposure and the transfer of the image). You check the result of the ActionCommand to see if the action was successful, and as an additional confirmation, assert that property mvActionAcknowledgesReceived holds the value 2.
Example 3: Suppose you have four cameras in a low-light scene, the action command is sent to all of the cameras, and the minimum condition is that at least three of them acknowledge the action command. All four cameras are now in the same action group, and you set mvActionAcknowledgesExpected to 3. In case that fewer than three cameras acknowledge the action command within the time defined by mvActionAcknowledgeTimeout, the ActionCommand fails. On arrival of the third acknowledge, the command is terminated successfully, and additional acknowledges are irrelevant.
For illustration, example 1 is implemented in a simplified manner; the two cameras in this example are now controlled in the same spot where the action command is configured and invoked.
As a first step the user selects the cameras. They must be GEV cameras, and they must be connected to the same interface.
The two cameras must be setup for action-based triggering, which in detail means opening the camera, and setting up the Action properties and the Acquisition properties for action-based triggering.
The second camera has an additional timer in-between the action signal and the frame start, delaying the trigger of the frame start by half a second.
After preparing the action command on the interface, setting up the interface to broadcast the correct action on this subnet and to expect two acknowledges
After this, acquisition is set up:
and the action command is invoked. Note the error handling which is possible with the returned result of the action command and the properties for evaluating the acknowledges, which allows you to deal better and faster with problematic situations.
The complete code used for this use case can be found at: GigEVisionActionFeatures.cpp