Purpose of this chapter is to optimize the color image of a camera, so that it looks as natural as possible on different displays and for human vision.
This implies some linear and nonlinear operations (e.g. display color space or Gamma viewing LUT) which are normally not necessary or recommended for machine vision algorithms. A standard monitor offers, for example, several display modes like sRGB, "Adobe RGB", etc., which reproduce the very same color of a camera color differently.
It should also be noted that users can choose for either
- camera based settings and adjustments or
- host based settings and adjustments or
- a combination of both.
Camera based settings are advantageous to achieve highest calculating precision, independent of the transmission bit depth, lowest latency, because all calculations are performed in FPGA on the fly and low CPU load, because the host is not invoked with these tasks. These camera based settings are
- gamma correction
- negative gain / gain
- look-up table (LUT)
- white balance
- offset
- saturation and color correction
Host based settings save transmission bandwidth at the expense of accuracy or latency and CPU load. Especially performing gain, offset, and white balance in the camera while outputting RAW data to the host can be recommended.
Of course host based settings can be used with all families of cameras (e.g. also mvBlueFOX).
Host based settings are:
- look-up table (LUTOperations)
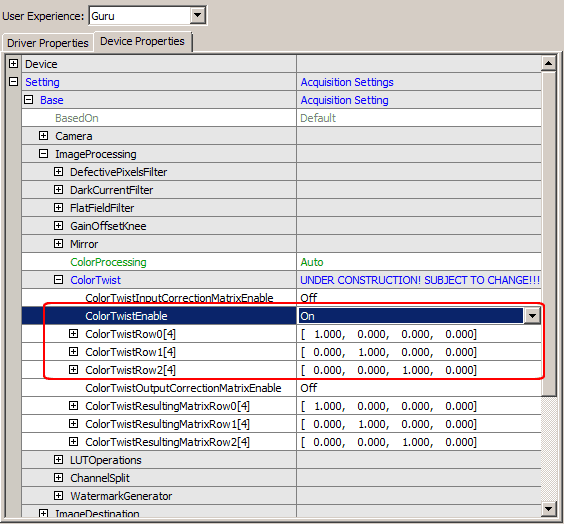
- color correction (ColorTwist)
The block diagram of the camera shows where the different settings can be found in the data flow of the image data.
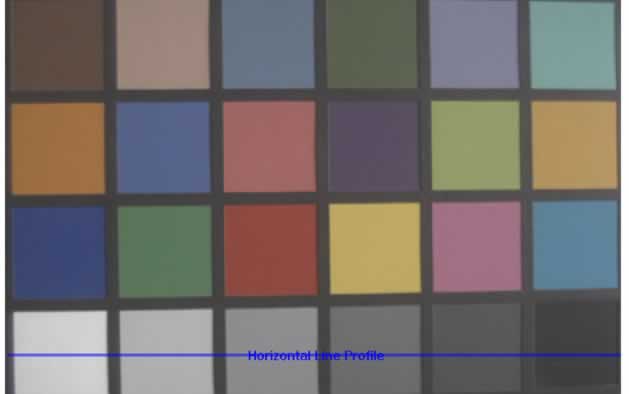
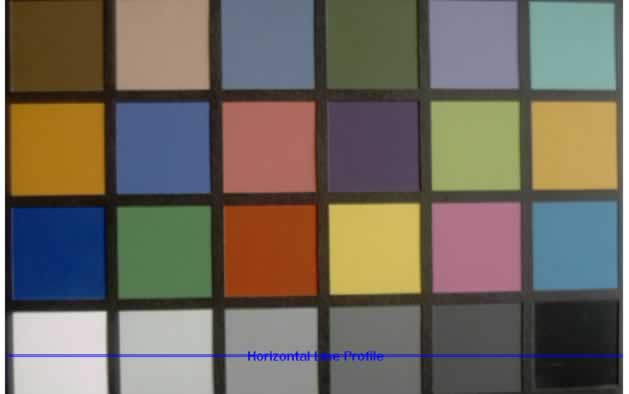
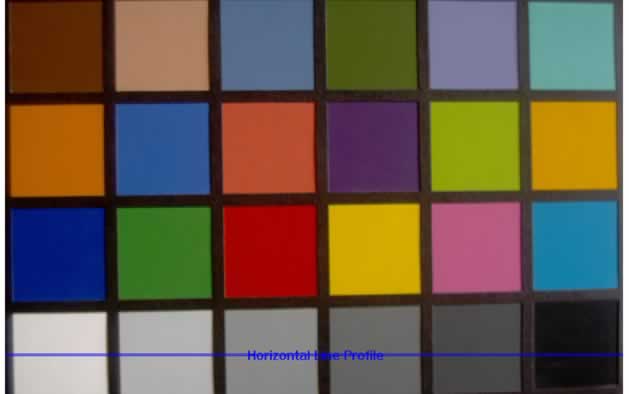
To show the different color behaviors, we take a color chart as a starting point:

If we take a SingleFrame image without any color optimizations, an image can be like this:
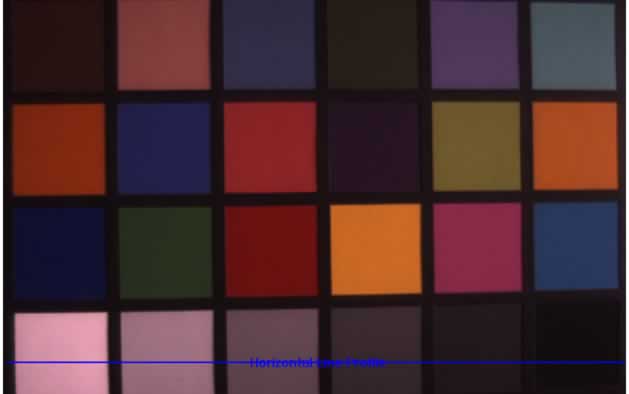
As you can see,
- saturation is missing,
- white is more light gray,
- black is more dark gray,
- etc.
- Note
- You have to keep in mind that there are two types of images: the one generated in the camera and the other one displayed on the computer monitor. Up-to-date monitors offer different display modes with different color spaces (e.g. sRGB). According to the chosen color space, the display of the colors is different.
The following figure shows the way to a perfect colored image
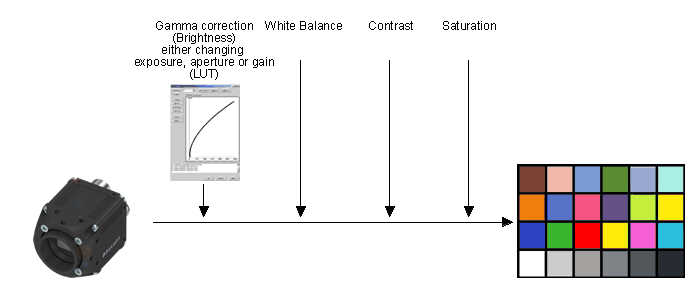
including these process steps:
- Do a Gamma correction (Luminance),
- make a White balance and
- Improve the Contrast.
-
Improve Saturation, and use a "color correction matrix" for both
- the sensor and / or
- the monitor.
The following sections will describe the single steps in detail.
Step 1: Gamma correction (Luminance)
First of all, a Gamma correction can be performed to change the image in a way how humans perceive light and color.
To do this, you have the following 3 possibilities:
- set Gamma using Gamma feature in AnalogControl,
- set Gamma using a LUT in LUTControl or
- set Gamma using a LUT in ImageProcessing.
- Note
- The first two possibilities are running on the camera, whereas the third is running on host system
The first and easiest way to set a Gamma is using the gamma feature in AnalogControl ("Setting → Base → Camera → AnalogControl")
mvGammaSelector is used to switch between a fixed mvSRGB gamma curve and mvUser which enables the Gamma property to set gamma between a value of 0.1 and 10.0 The Gamma feature is working on the camera and enabled by setting mvGammaEnable
- Note
- mvGammaEnable can only be set if no LUT in LUTControl is active
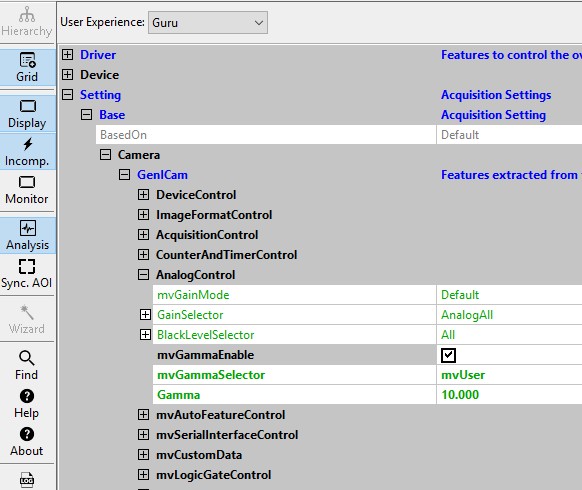
- Note
- To avoid artifacts while changing the Gamma value, stop Acquisition before changing values and afterwards, start Acquisition
The second way is setting Gamma via LUTControl using ImpactControlCenter, here, the following steps have to be done:
- Click on "Setting → Base → Camera → GenICam → LUT Control → LUT Selector".
-
Afterwards, click on "Wizard" to start the LUT Control wizard tool.
The wizard will load the data from the camera.
Figure 6: Selected LUT Selector and click on wizard will start wizard tool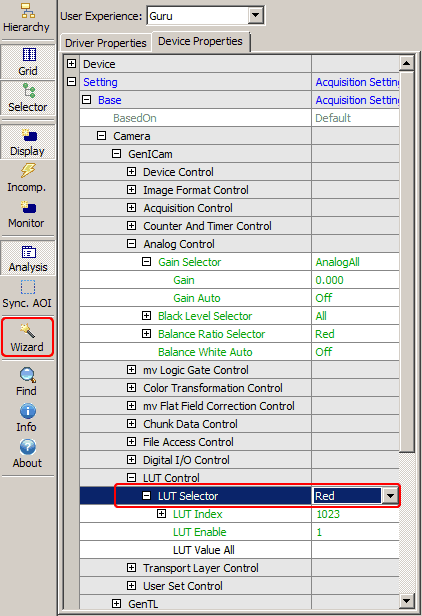 Figure 7: LUT Control
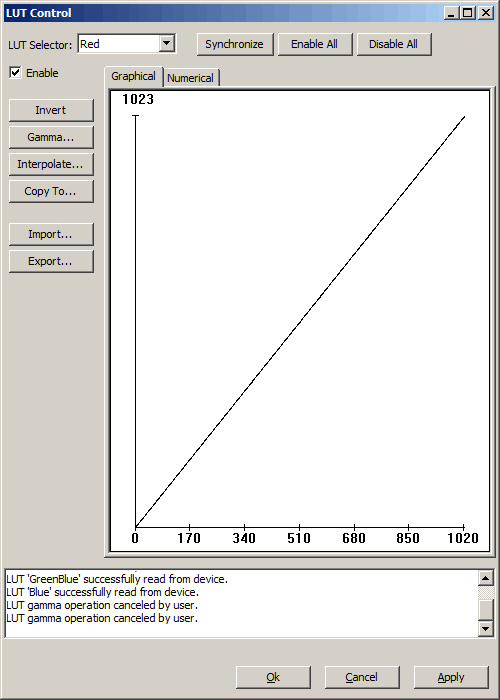
- Now, click on the "Gamma..." button
-
and enter e.g. "2.2" as the Gamma value:
Figure 8: Gamma Parameter Setup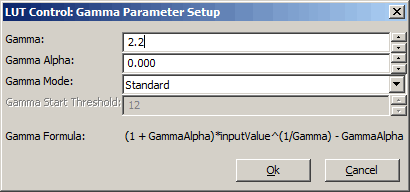
- Then, click on "Copy to..." and select "All" and
- and click on "Enable All".
-
Finally, click on Synchronize and play the settings back to the device (via "Cache → Device").
Figure 9: Synchronize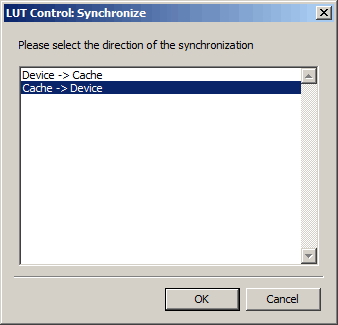
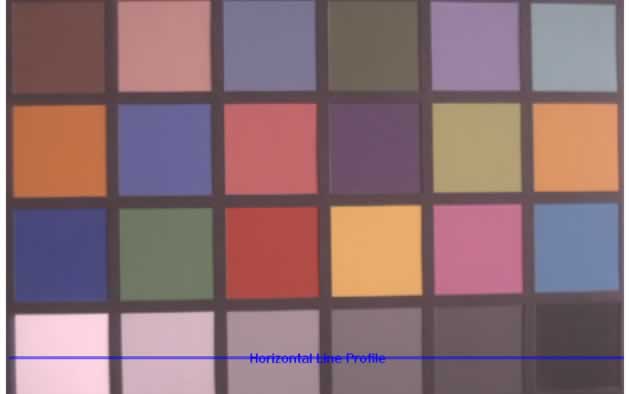
After gamma correction, the image will look like this:
The third way to set Gamma, is gamma correction via ("Setting → Base → ImageProcessing → LUTControl"). Here, the changes will affect the 8 bit image data and the processing is running on the CPU of the host system:
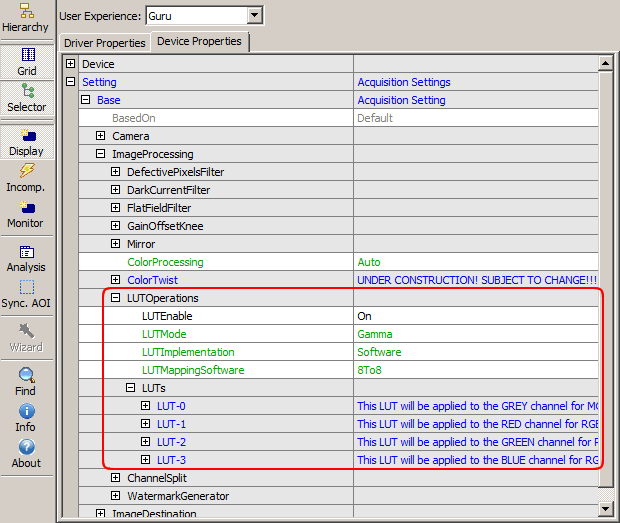
Figure 12: LUTControl dialog
Just set "LUTEnable" to "On" and adapt the single LUTs like (LUT-0, LUT-1, etc.).
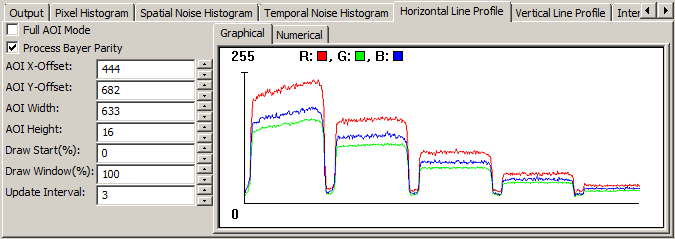
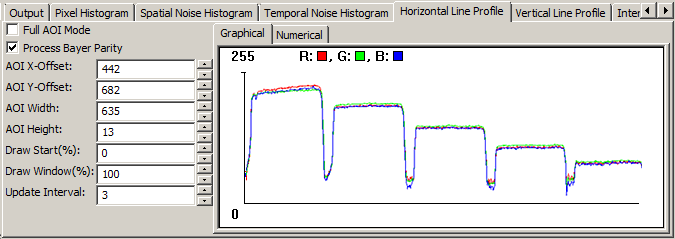
Step 2: White Balance
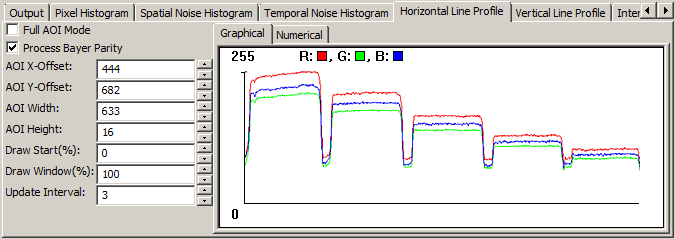
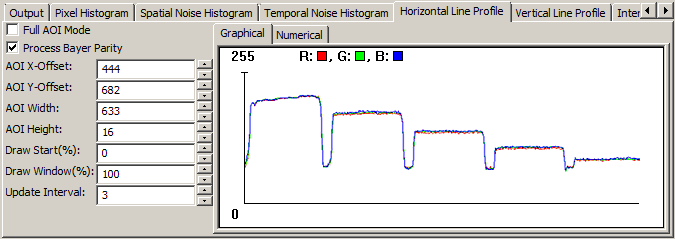
As you can see in the histogram, the colors red and blue are above green. Using green as a reference, we can optimize the white balance via "Setting → Base → Camera → GenICam → Analog Control → Balance Ratio Selector" ("Balance White Auto" has to be "Off"):
- Just select "Blue" and
-
adjust the "Balance Ratio" value until the blue line reaches the green one.
Figure 13: Optimizing white balance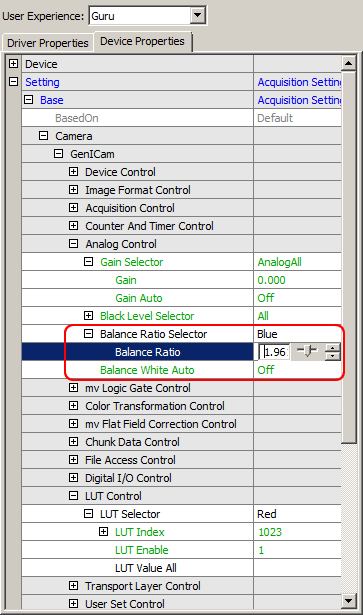
- Repeat this for "Red".
After optimizing white balance, the image will look like this:
Step 3: Contrast
Still, black is more a darker gray. To optimize the contrast you can use "Setting → Base → Camera → GenICam → Analog Control → Black Level Selector":
- Select "DigitalAll" and
-
adjust the "Black Level" value until black seems to be black.
Figure 16: Back level adjustment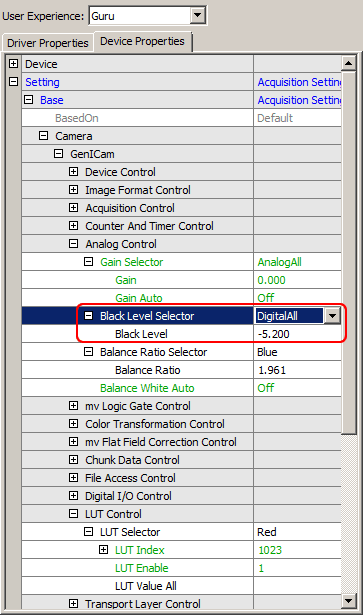
The image will look like this now:
Step 4: Saturation and Color Correction Matrix (CCM)
Still saturation is missing. To change this, the "Color Transformation Control" can be used ("Setting → Base → Camera → GenICam → Color Transformation Control").
- Note
- In our optical laboratory we determine the best correction data for the sRGB color space for each sensor type and these parameters are shipped with our cameras. If you want to use these parameters, you have to activate them using the wizard of the Color Transformation Control.
- Click on "Color Transformation Enable" and
-
click on "Wizard" to start the saturation via "Color Transformation Control" wizard tool (since firmware version 1.4.57).
Figure 19: Selected Color Transformation Enable and click on wizard will start wizard tool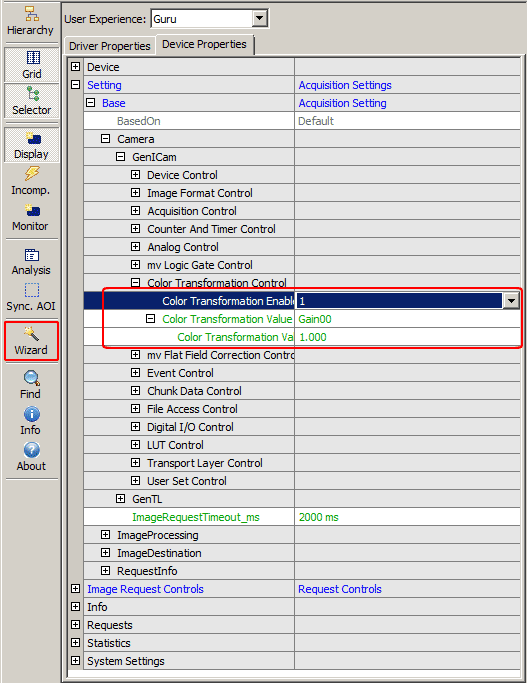
-
Now, you can adjust the saturation e.g. "1.1".
Figure 20: Saturation Via Color Transformation Control dialog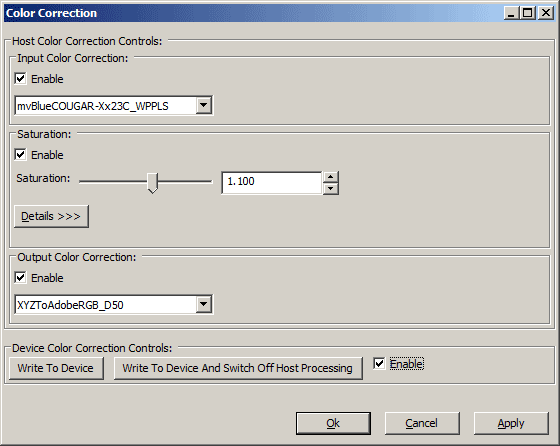
- Afterwards, click on "Enable".
-
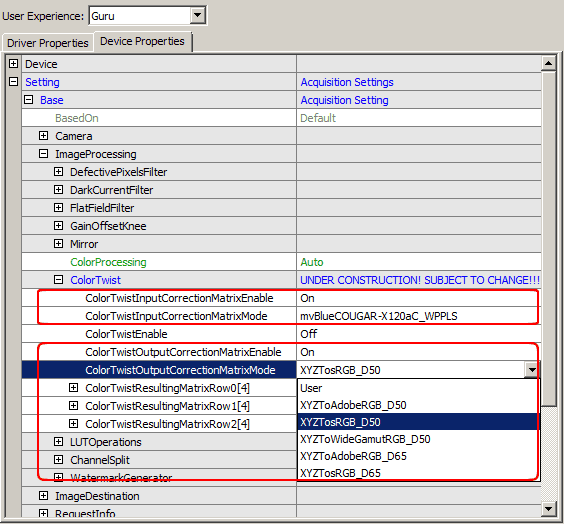
Since driver version 2.2.2, it is possible to set the special color correction matrices at
- the input (sensor),
- the output side (monitor) and
- the saturation itself using this wizard.
- Select the specific input and output matrix and
- click on "Enable".
- As you can see, the correction is done by the host by default ("Host Color Correction Controls"). However, you can decide, if the color correction is done by the device by clicking on "Write To Device And Switch Off Host Processing". The wizard will take the settings of the "Host Color Correction Controls" and will save it in the device.
- Finally, click on "Apply".
After the saturation, the image will look like this:
- Note
- As mentioned above, you can change the saturation and the color correction matrices via ("Setting → Base → ImageProcessing → ColorTwist"). Here, the changes will affect the 8 bit image data and the processing needs the CPU of the host system: